- Published on
Tutorial & Review: Building a Reddit Question Scraper Using n8n
- Authors

- Name
- Chris
- @molehillio
Introduction
In recent years the topic of automation has become... well... more topical. Though automation as a theme dates far back into history, web based automation tools have been around since around 2010. Starting with early pioneers such as If This Then That (IFTT) and Zapier, all the way to the current year, where newcomers such as Make and n8n have jumped onto the scene.
Web based automation platforms are a type of "no code" (or "low code" in some cases) platform designed around visually building workflows and automations to carry out some specific task. This could be anything, but common modern examples include:
- Downloading recent orders from an e-commerce platform, and sending out confirmation emails
- Downloading recent transactions from accounting software, and calculating financial or sales metrics
- Sorting through customer complaint emails, and prioritizing them based on urgency
and many more, in various combinations.
In this series, we will be trying out several different automation platforms by building the same workflow in each of them, to see what their individual strengths and weaknesses are. In this specific article however, we will cover the new kid on the block, n8n. Read along, and build along with us!
This article contains affiliate links. If you sign up through our links, we may earn a commission at no extra cost to you.
Table of Contents
- What is n8n?
- Workflow Specification
- Building the Workflow
- Conclusion
- Frequently Asked Questions
- How do I scrape Reddit posts with n8n?
- Can n8n connect to Reddit without OAuth credentials?
- How do I prevent duplicate posts in an n8n Reddit scraping workflow?
- How do I use AI in an n8n workflow without it getting expensive?
- What is the n8n expression syntax?
- Can n8n send Slack messages as part of a workflow?
What is n8n?
The name n8n is derived from the original name of the project, which was nodemation. In typical Silicon Valley style, the middle letters got condensed into their count, in this case, 8. The product itself is a visual workflow automation system that uses a system of connected "nodes" to turn a series of simple individual steps into a complex automation.
It's worth defining some terminology before we start.
- Workflow: A series of steps that are executed in order to carry out some high level task.
- Node: A single step in a workflow. This could be for instance downloading some data, filtering or manipulating data, or writing data to a database, or sending a message on slack. Each node has an input and an output where data goes in to the node and out after it is done, respectively.
- Connection: A connection between nodes, signifying that the output of one node, becomes the input of another.
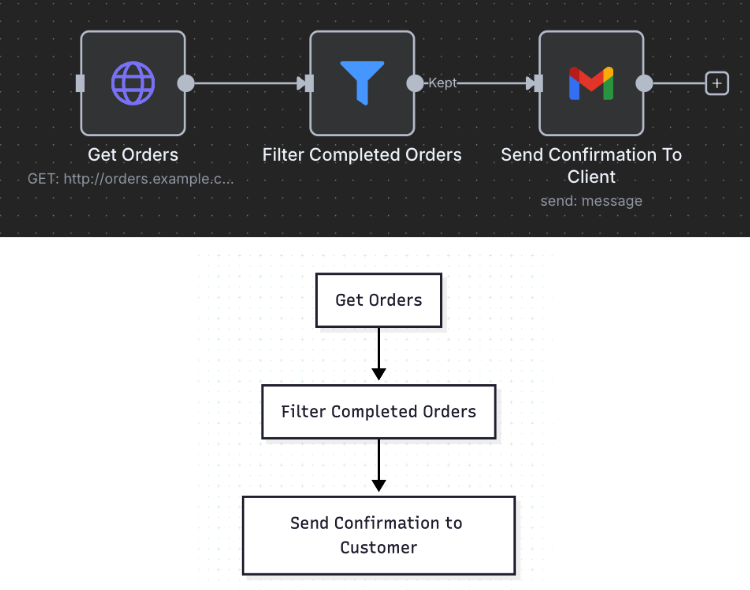
We will be learning the specifics of the system as we go, but for now it is worth thinking of workflow automation as a flowchart. For instance, consider the following three step workflow. The flowchart and the n8n workflow in effect represent the same process.
n8n itself provides two ways of using it. n8n cloud is a paid cloud hosted service, which is simple to use and set up and provides everything you need to start automating workflows. For those who are more technically savvy, there is also the self hosted option, though this requires installing and setting up n8n on either your local machine, or a cloud server of your own.
For less experienced users, the free trial on the cloud is probably the simplest option for getting started. For a detailed breakdown of all n8n pricing tiers and which one might be right for you, see our complete n8n pricing guide.
Workflow Specification
In order to give a proper overview of n8n, we will design an example real world workflow, and use the product to automate it.
Consider that you are the brand manager of a pet food company. Now, because I am a cat owner, we will be going with cat food. As the brand manager, you want to keep an eye out for relevant discussions on Reddit, as these can be a treasure trove of customer information, as well as an opportunity for your brand to engage with its customers. In order to limit the scope, let's assume that we are interested in knowing when someone asks a question about cat food on the r/catadvice. Indeed, we are especially interested when someone asks for a cat food recommendation or suggests any specific brand.
We therefore can write out the requirements for our workflow:
- Look at recent posts AND comments on the r/catadvice subreddit.
- Identify any posts that are a question or contain a question, and ignore the rest.
- For each question post, determine if it is related to cat food in any way.
- For each cat food question post, extract (if any) the brand mentioned, and a summary of the users post.
- Save these to a google sheet for review.
- Send a message to slack with a summary of the message, and a link if we want to see more.
This workflow, while relatively simple, represents a realistic business requirement, and also provides ample opportunity to test out different types of technique, such as HTTP calls, filtering, custom code, and even AI usage.
Building the Workflow
We will assume that you already have an account on n8n set up. If you don't, you can do so here. This tutorial / review is written in "real time", so you will be learning how the workflow is build along with me!
Setting Up a Trigger
First we will create a new workflow by clicking the Create Workflow button. You can optionally rename this workflow to Reddit Question Scraper, by clicking the three dots in the top right, and clicking Rename. You will be greeted with an empty work area, where we can start to assemble our nodes to build our workflow.
The first step that we need to create is the trigger of our workflow. There are many ways to start a workflow, for instance:
- Manually clicking to start
- Starting on a timer periodically (e.g. once a day)
- Starting when some event, such as a webhook is triggered
Because we are making a basic workflow, we will go with the manually triggered start. Click the + icon in the top right to add a new node, and choose the Trigger Manually. You can then move the node around on the workspace, so for now put it somewhere central.
From now on, when we add a new node, we will be using this menu. It comes with a helpful search bar so that we can easily find what we are looking for. Our trigger right now doesn't really do anything, but it gives us a place where we can run our workflow.
Scraping the Initial Posts
To fulfill our first requirement, we are going to need to scrape some posts for the r/catadvice subreddit. Searching through our node options, we can find that n8n already provides us a Reddit node. Looking at the documentation, we can use this node to get posts from Reddit, which is great. If you are setting this up today, note that Reddit changed API access rules in late 2025; we cover your current options in our Reddit API policy update guide.
But... we won't be using it. The reason for this is that we want to do the work a bit more manually to really test things out, so we will instead be doing things the old school way, by using HTTP. Not everyone knows, but reddit has a (not so) hidden feature that allows us to change any page into structured reddit data.
By adding .json to the end of any URL, we can in fact get the same data but in pure JSON format, allowing easy access to the data. For instance, consider the following post url: https://www.reddit.com/r/n8n/comments/1m1g9u7/weekly_self_promotion_thread. We can add .json to the end, and we will get back the same post but in easy to parse JSON format: https://www.reddit.com/r/n8n/comments/1m1g9u7/weekly_self_promotion_thread.json.
Click the + icon, and search for the words HTTP and add the HTTP Request node.
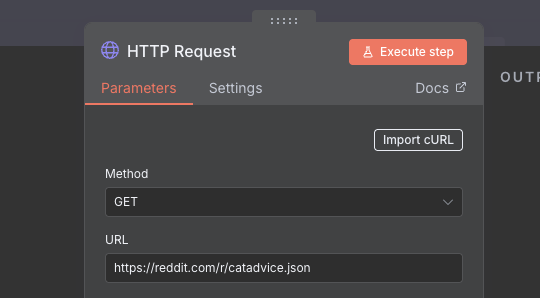
Each node has a details dialog that comes up whenever you create it, or if you double click it. This dialog is different depending on the node in question, and allows you to configure how the node works. In this case, our main aim is to do an HTTP GET request on the r/catadvice URL, which is https://reddit.com/r/catadvice.json. Fill out the URL field on the node, and click Back to Canvas in the top left to get back to the workspace.
TIP
Make sure to save often by clicking the orange save button in the top right hand corner. Unfortunately, n8n does not seem to have an autosave feature which would be a very useful addition. As it stands, it can be easy to forget to save and lose your work!
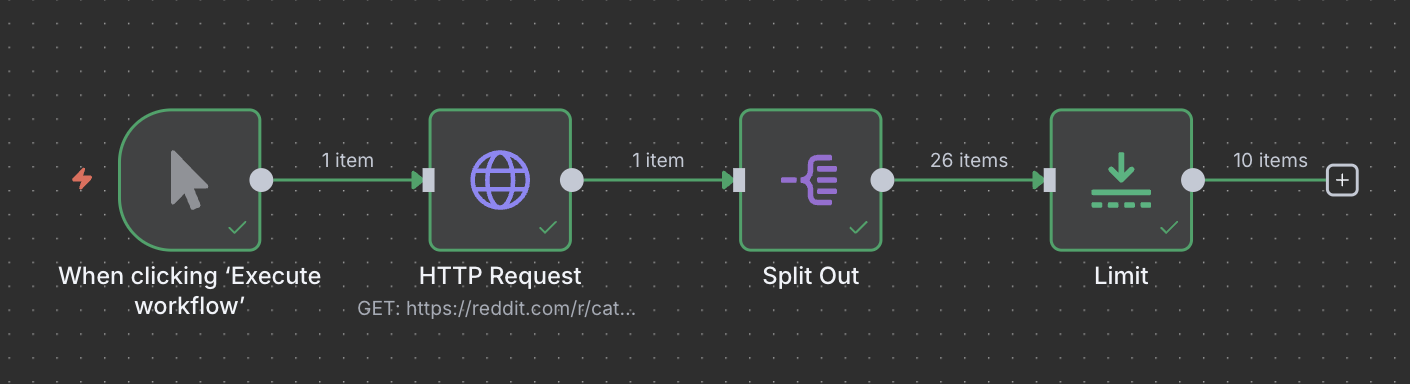
We now have two nodes, and so we need to connect them. In n8n, nodes typically have an input and an output connection. Connecting the output of one node to the input of another nodes means that the data outputted from the first node will be available to the next node. The Manual Trigger node does not have any output data, but it does trigger the next node to run, so click on the output of the manual trigger node, and attach it to the input of the HTTP node.
Now that everything is connected up, let's try and run our workflow. Click the large orange Execute Workflow button at the bottom of the screen (or next to the manual trigger node) to execute it. If everything has gone well, you should see a green popup in the bottom right corner indicating that the workflow has succeeded.
Double click on the HTTP Request node, to see what the output was. A really nice aspect of n8n is that at every node in the workflow you can see both the input (on the left) and the output (on the right) of the latest execution. This makes it really easy to see what the effects of the node are.
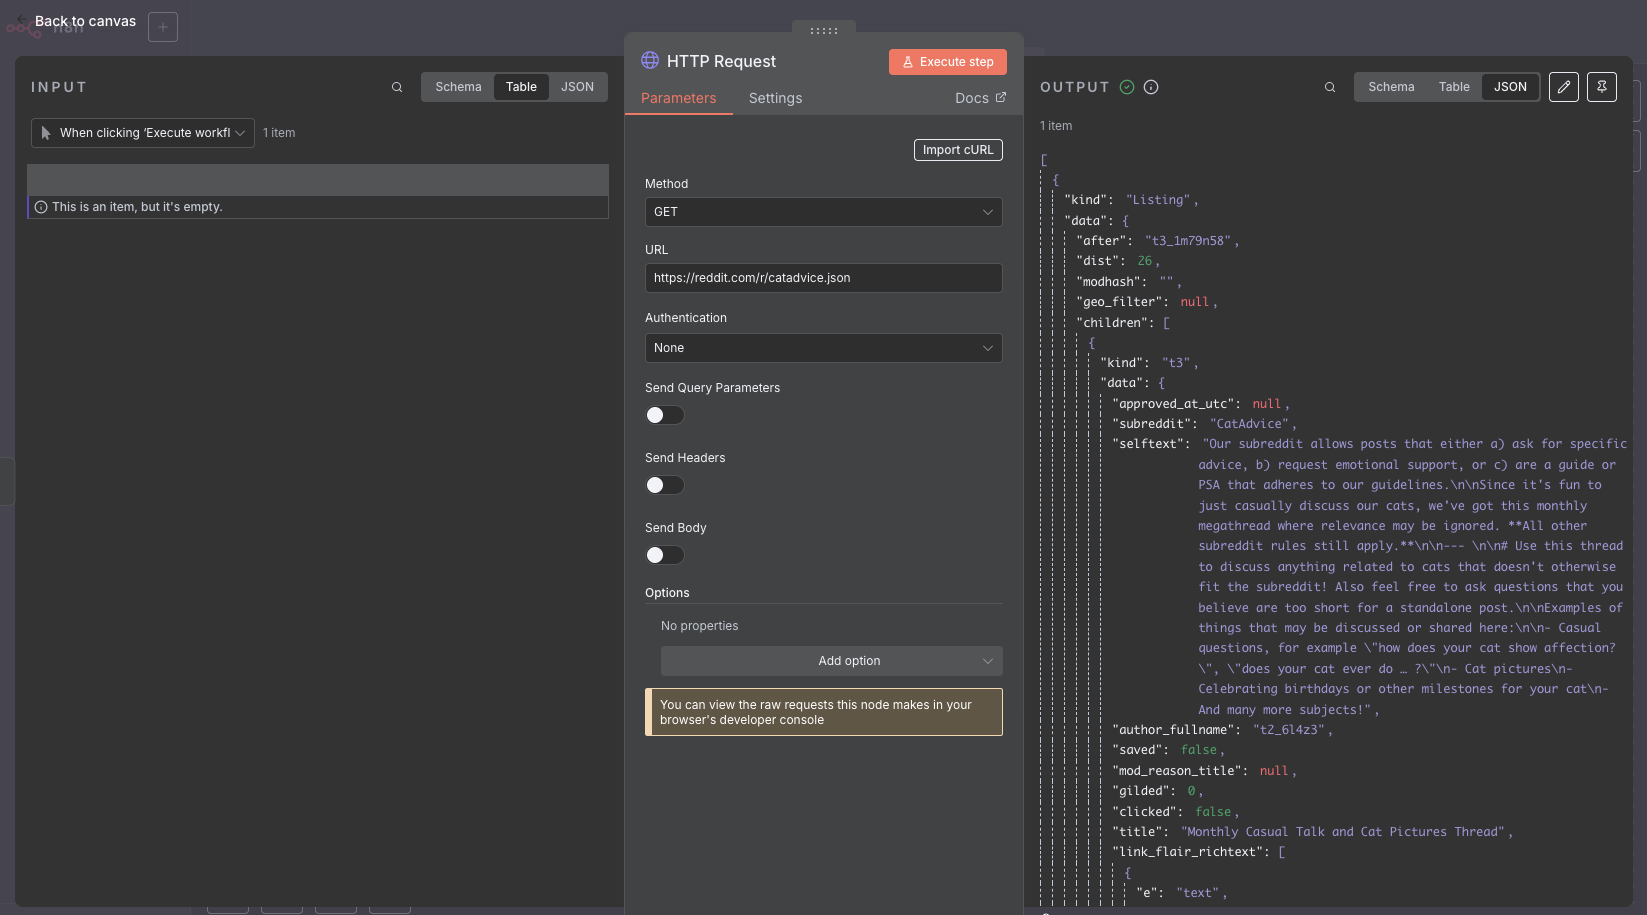
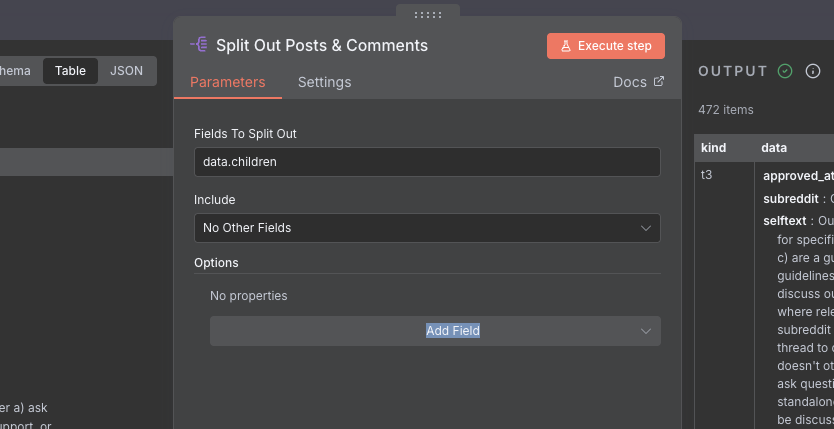
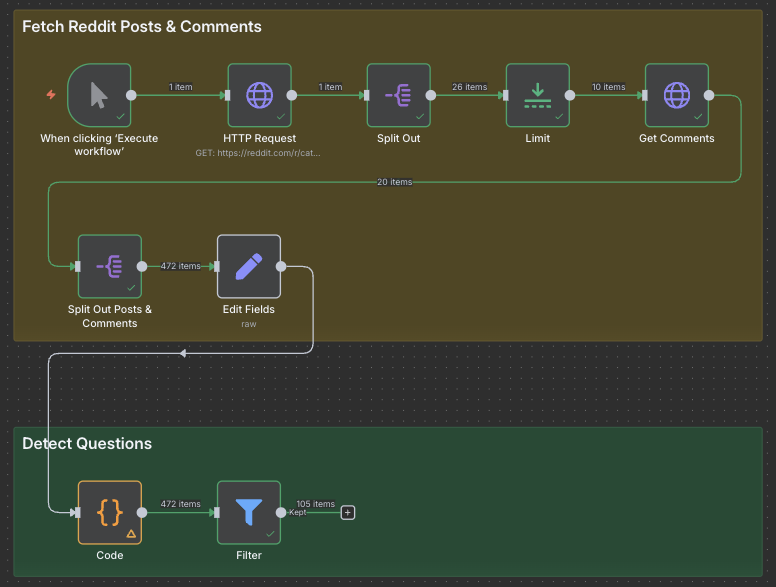
We can see that we have managed to download the JSON data for the r/catadvice subreddit. Looking through it, we can see that the data we need is nested within the structure. We can get the list of posts by following the following path: data.children. To get that out, we can use the Split Out node (search for it). Just like before, we connect it to the output of the HTTP Request node. We can then double click on it to set what field we want to extract, which in this case is data.children.
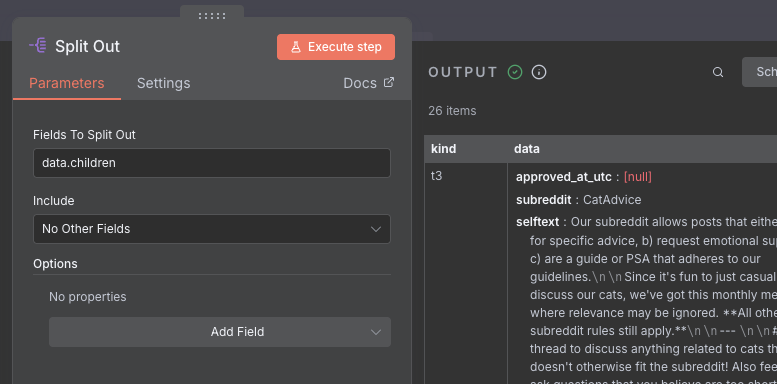
Let's take a look at the data that we have got back. We can see that there are 26 individual posts that we got back. However, given that we want to look at the comments also, we probably want to limit that amount so that we don't hit Reddit's rate limits (see the note below). We can add a Limit node to only select the first 10 posts. Connect the node to the output of the Split Out node, and choose 10 as the maximum items to select.
Scraping the Comments
We now have 10 posts from the subreddit. Next up however, we also need to get the comments. This... is a bit harder. For every one of the posts that we have collected, we will need to make a separate HTTP call in order to get the JSON for the comments. As you can imagine, the amount of calls we need to make is the same as the amount of posts we collected, so we want to be cautious to not hit the Reddit rate limits (see the earlier warning).
We will create another HTTP Request node, and connect it to the output of the Limit node which has our cleaned up posts. As mentioned earlier, for each item in the list that is passed to the input, the node will run once. So for each post that we pass in, we will make one call to Reddit to get the comments.
CAUTION
It's a good time to mention rate limits. Most services, such as Reddit, will limit how many times per minute you can make API calls and request data. If you call more frequently than this, you may get "rate limited" meaning you will get a 429 Too Many Requests error back, preventing you from getting more data. For instance, non authenticated accounts can only call the Reddit API ten times per minute.
Be careful, as abusing these limits may get your IP and/or account banned by Reddit! For peace of mind, it is worth reading Reddit's API Terms.
In the image below, we are using a very handy feature of n8n, which is the expression syntax. Basically, any of the configuration options for each node, can use the input data directly. n8n uses JavaScript as the configuration language, and you can access the node's input by writing $json and putting in the path to the data you need. Any text between two sets of curly braces ({{ }}) will be interpreted as JavaScript.
The link to the post comes from the permalink field. Like before, we will use the .json trick, but we also need to put https://reddit.com at the front, as the URLs from the posts don't have that.
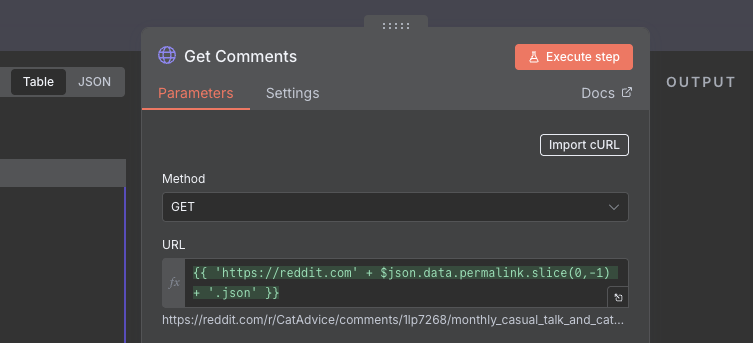
We use url.slice(0,-1) to remove the last / in the permalink URL so that we can add the .json.
{{ 'https://reddit.com' + $json.data.permalink.slice(0,-1) + '.json' }}
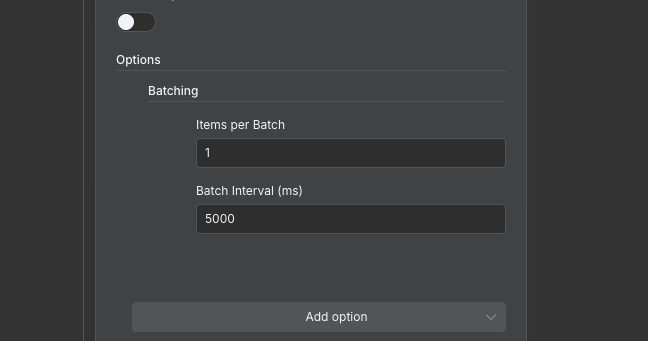
But wait! Don't run it yet. We know that this node will need to run 10 times, and we don't want to get rate limited. We will do this by making sure that we wait (or sleep if you are a developer) for some time between calls, so that we don't overload the server. We can do this by clicking the Options button on the HTTP Request node, and selecting Batching. I'm going to be super conservative and say that we will only do one request every five seconds, but probably this can be a bit higher.
Now that the node has been configured, let's run the workflow again and see what the comments look like!
TIP
Running the whole workflow over and over again can become tedious, especially if there are rate limits or other slow bits involved. You can save time by double clicking a node, and executing just that node individually. This will use cached input data from the previous node, meaning you don't need to run the steps before!
Looking at our output, we can see that we have 20 (not 10) results. Why is this? It seems that when you query the post's page, you get back two items: the post itself, and the comments. This is useful, as it means that we can just process all of the items to get the data we need, since they share the same schema (they have the same keys). Just like we did before, we will use a Split Out node to get the children from each of the items. Attach a Split Out node to the end of the HTTP Request node for the comments, and configure it to get the data.children key out.
We now have 472 items, that's a lot of data! The amount of keys we have is pretty huge, and we don't need 90% of the stuff we got back from the API. Let's fix that by getting into a much simpler format. We first however need to decide what data is important to us (as the brand manager). Let's go with the following:
- id: The unique ID of the post from Reddit. This will be useful later for identifying individual posts.
- title: The title of the post.
- body: The main body of text in the post (basically the text post itself).
- url: The URL of the post.
- type: A field that we can use to tell posts and comments apart. For posts this will be
postand for comments this will becomment.
To get the data into the format we want, we can attach an Edit Fields node to the end of the new Split Out node. An important concept to grasp with n8n is that the data passed to a node is always a list of items. The node will always execute on EACH item individually. So in this case, the Edit Fields node will pull out the data for each of the 472 posts, and return another list with the 472 posts, minus the extra cruft, and with the keys we want.

In this case, we want to create an object using the previous object, so we create a JSON structure, using only the data that we need from the post. We use the same expression syntax as before, and the exact syntax is below.
{{
  {
    "id": $json.data.id,
    "title": $json.data.title,
    "body": $json.kind == 't3' ? $json.data.selftext : $json.data.body,
    "url": $json.data.permalink,
    "type": $json.kind == 't3' ? 'post' : 'comment'
  }
}}
You might notice that we are using some special "conditional" syntax here. To explain, on Reddit posts have a kind of t3, while comments have a kind of t1. We use this kind field to tell posts and comments apart, as they have some differences (such as using selftext for the post text, vs body for the comment text). Let's step back and look at what our workflow looks like now.

Finding the Question Posts
Looking at our output, we now have a clean table of posts with all of the extra data cut out. It's taken a few steps to get our dataset, but now we are in a position to look at the second requirement: Figuring out which posts or comments are questions. Those of you who are more gung-ho might say: "Let's send this to ChatGPT and just ask if this is a question". This is a valid point, and we will be using AI later. However, using AI is expensive!
For instance, using Claude Sonnet 3.7 to parse a 1000 word post would cost somewhere in the range of around half a cent ($0.005). Doesn't sound like much right? Now consider that we parse every single one of our 472 posts and comments, that's now $2.36. Bit more, but still OK? Now consider you are doing this every hour, totalling over $56 per day, so $1,700 per month! That's just for the top 10 posts on one medium sized subreddit!
WARNING
Whenever you build any kind of workflow which uses AI, be careful to limit the amount of data you send to it. AI credit costs can add up quickly, so you want to avoid surprises and make things fail safe. We didn't do it in this workflow to keep things simple, but a good example would be to e.g. add another Limit node with a maximum count of 500, to prevent any more than 500 posts getting processed by the AI.
Try and keep these edge cases in mind when building!
AI might indeed seem cheap, but as your data volume grows, the costs can add up extremely fast. In order to prevent this issue, we need to drastically reduce the number of posts before we send it to the AI. To do this, we will use the n8n Code node. This node allows you to write custom JavaScript code to carry out any data processing that is too complicated for the individual nodes. The availability of this node is a huge boon, especially if you are comfortable writing your own code.
Add a Code node to your workspace, and connect it to the output of the Edit Fields node. Once that's done, double click on the node, and you will be greeted with a small web-based IDE (Integrated Development Environment), which is a small editor for writing code. We also have two options to choose from. We opt to run the code Once For Each item as we want to look at each post individually. You can also opt to run the code once for the whole list, which allows you to loop over items, and is nice if you want more control over filtering, etc. n8n gives us the choice of JavaScript or Python for writing our code, which are sensible choices, though I admit having the option to use TypeScript would have been nice (from a dev point of view).
From our requirements, our goal is to try and figure out if the post is a question or not. Without AI, there are still ways that we can use to try and figure out if a post is a question or not, even if they might not be the most accurate. For instance:
- Does the title or body end in a question mark?
- Does the post contain any question works (who, what, why, where, how)?
Also, because it's 2025 we can ask AI to write the code for us (which is nice, as we only have to ask the AI once, rather than for every post). I used the following prompt on Google Gemini:
Write a Javascript script for an n8n code node that will identify if a post is a question.
Assume that the input is a single post item, and comes in the $input variable.
The post contains the following keys: title, body.
Use minimal comments.
Use regex to avoid spurious matches.
Test both the title and body, and test for sentences ending in question marks, or containing question words.
I made some small changes, such as reducing the number of question words. For instance, the word when is not really relevant to us, as we are looking for questions about feeding, which would be more what or which. Finally, I got this:
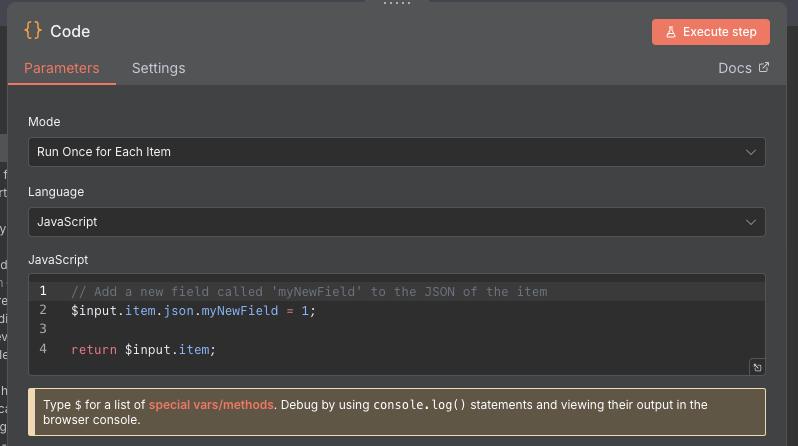
// Define common question words for detection
// Get the input item's data.
const item = $input.item.json;

// Ensure title and body are strings, even if they are null or missing.
const title = item.title || '';
const body = item.body || '';

// Combine title and body to test the full text of the post.
const fullText = `${title} ${body}`;

// Regex to detect a question mark at the very end of the text.
const endsWithQuestionMark = /\?\s*$/;

// Regex to detect common question words. \b ensures whole words are matched.
const hasQuestionWords = /\b(what|why|how|which)\b/i;

// Default to false.
item.isQuestion = false;

// A terminal question mark is a definitive sign of a question.
if (endsWithQuestionMark.test(fullText)) {
  item.isQuestion = true;
}
// As a fallback, check for question words anywhere in the text.
else if (hasQuestionWords.test(fullText)) {
  item.isQuestion = true;
}

// Return the item with the new 'isQuestion' field.
return item;
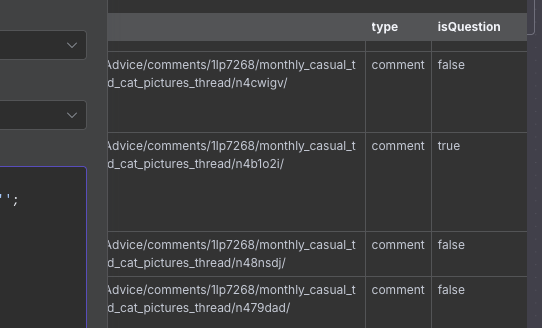
We copy and paste this code into the Code node, and then execute the node. We have a lot of posts so this takes a bit of time, but once it is done we see that each post now has an additional isQuestion field stating whether the post is a question or not (according to our code anyway).
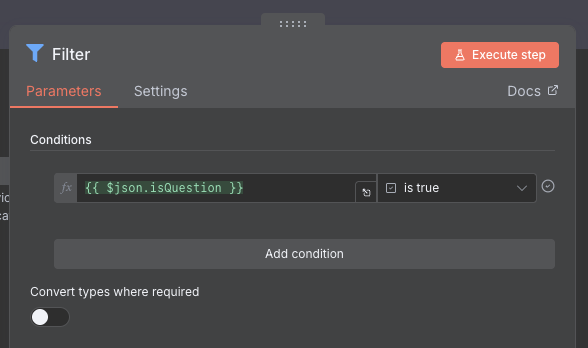
We don't care about the posts that aren't questions, so now let's add a Filter node. This node will take one or more conditions, and filter out any items that don't match this condition. In this case, we want to filter out any posts that are not questions, so we set the filter to only let through posts that have the isQuestion field set to true (from our previous step).
Using AI to Determine Relevance
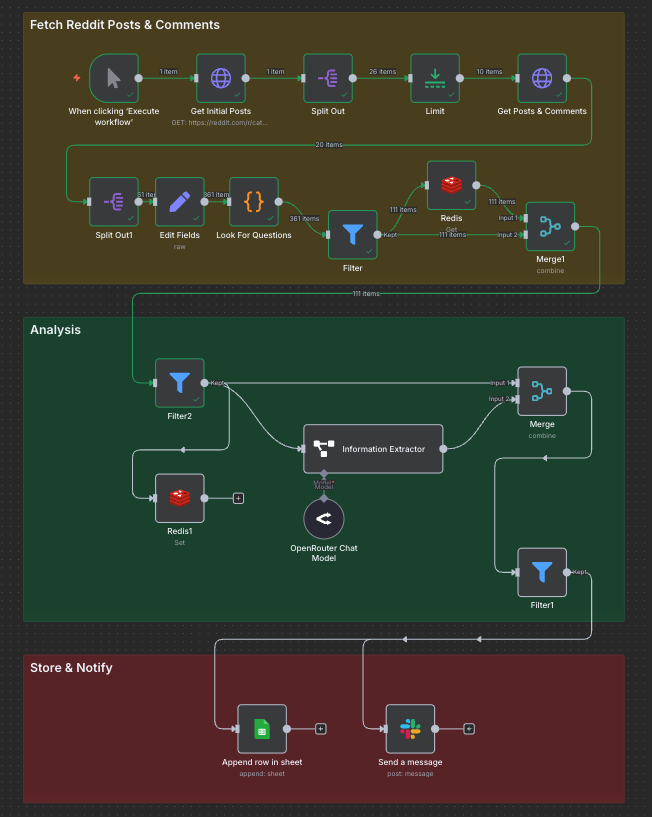
Let's step back again and take a look at our workflow.In order to improve readability, we have re-arranged some of the nodes so that it's not all one big line.
You can easily do this by dragging a box around a group of nodes, and moving them to a different spot. In addition, I have also added Sticky Notes, which are the big colourful boxes which you can use to group the sections of your workflow together. You can add one by right clicking on the canvas, and clicking Add sticky note. One thing that would be nice for n8n to have, would be the ability to move the connections around. In this example, the line cuts right through the sticky note text, which triggers my OCD :(
Looking at the output of the filter node, we have managed to cut the number of posts down to 105. Honestly, that's still a lot, and I think with further code changes we could get it down a bunch more (such as looking for food-based keywords), but for now this is good enough! We are ready to move on to the next requirement, which is to use AI to inspect our selected posts more closely to see if they are cat food related.
To do this, we will be using the Information Extractor node. This is a special "AI" node that is different than some of the others that we have seen. For a start, it has more than two connections.
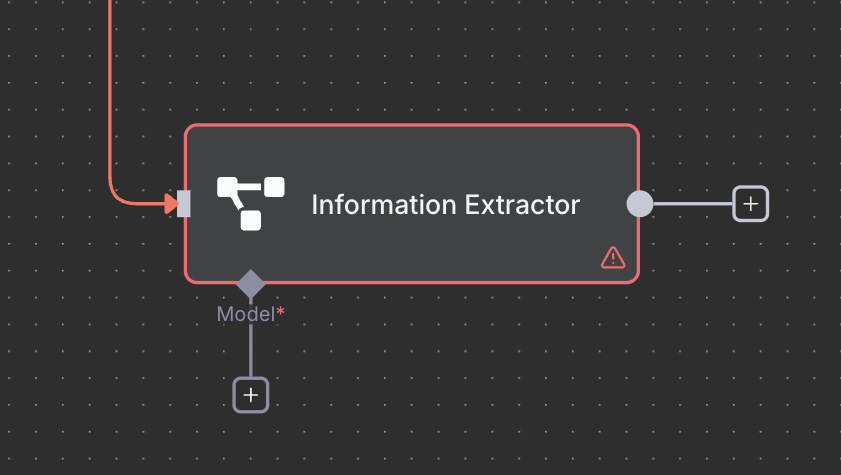
n8n has a selection of different AI nodes, which can do different things. These range from simple nodes such as the Information Extractor all the way up to Agent nodes, which can make decisions by themselves, and also use tools. One thing that all of the AI nodes have in common, is that they need a model. n8n does not have any built in AI, and instead leaves the choice of model and API up to you. This is quite powerful and flexible, although it does require some set up.
The Information Extractor is a node that is used to extract structured data (e.g. JSON) from unstructured data such as written text. This is perfect for our usecase as we want to get some specific data from our posts. However, first we need to choose an AI model to use. There are dozens of AI providers and models these days, and depending on what you have you can attach almost any provider you want assuming n8n supports it. If you click on the model input of the node, you can choose a provider from the list. In our case, I will be using OpenRouter as this service gives us access to various different models, all in one place.
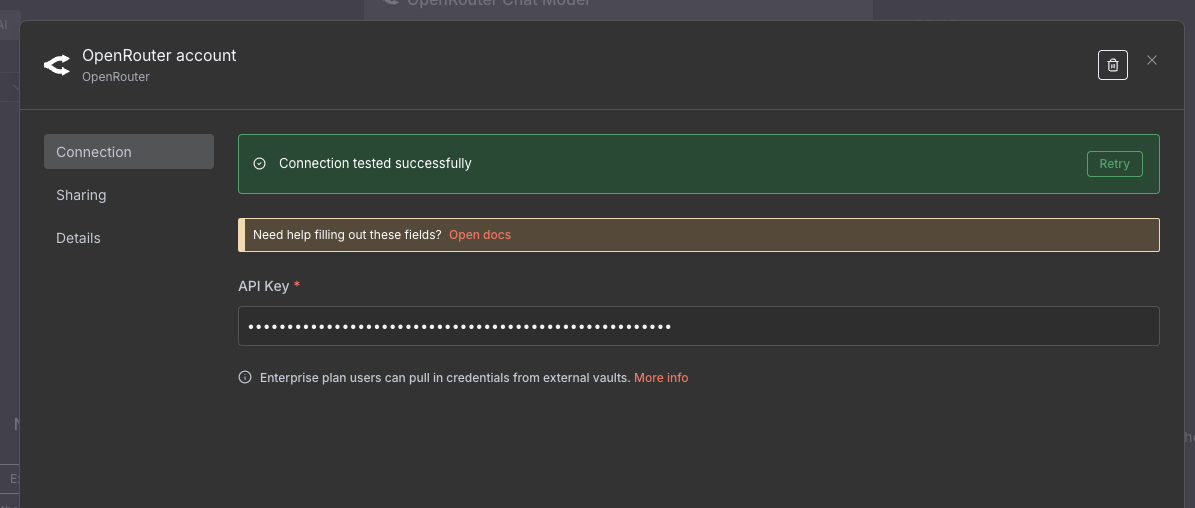
Now that the model has been added, we need to configure credentials for the AI model provider. Double click the node, and in the Credential to connect with dropdown, select Create new credential. Depending on your provider, you may need to provide different information, but usually you need to provide an API Key. For OpenRouter, you can check out this page for info on how to create an API key. Once the credential is set up, make sure that n8n confirms that the connection has been tested successfully. Make sure you also choose a model to use, which in my case will be openai-gpt-4.1-mini.
If you haven't already, connect the Information Extractor node to the output of the Filter node. For our use case, we want to take each post, and extract some data from each one. Namely:
- Is the post a question relating to cat food?
- Is a particular brand of cat food mentioned?
- A short summary of the user's post
Double click on the Information Extractor node, and you will see that there are two important fields.
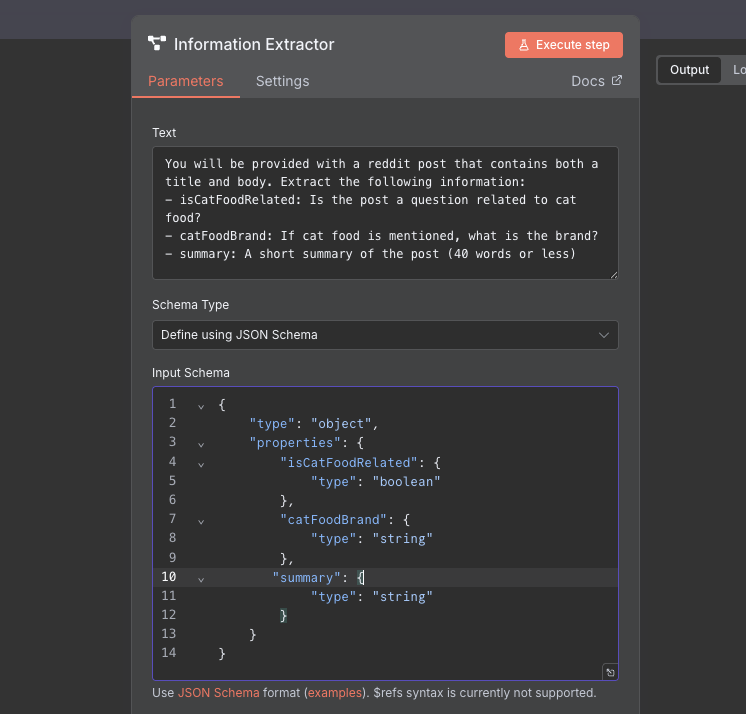
The text (prompt), and the schema. For the text part, we need to provide a written prompt as to what exactly we are looking for. We will use the following prompt to do this, and note that we use the expression syntax to put the title and the body into the prompt (we call this the context).
You will be provided with a reddit post that contains both a title and body.
Extract the following information:
- isCatFoodRelated: Does the post mention cat food?
- catFoodBrand: If cat food is mentioned, what is the brand?
- summary: A short summary of the post (40 words or less)

Title: {{ $json.title }}
Body: {{ $json.body }}
Next, we need to provide a "schema" (the structure of the data we want) so that the model knows what to return and what the types are. This uses a language called JSON Schema to define our types. There is also an option to generate this from an existing JSON payload, though we don't have this right now so we can't use it. For our schema, we will use the following:
{
  "type": "object",
  "properties": {
    "isCatFoodRelated": {
      "type": "boolean"
    },
    "catFoodBrand": {
      "type": "string"
    },
    "summary": {
      "type": "string"
    }
  }
}
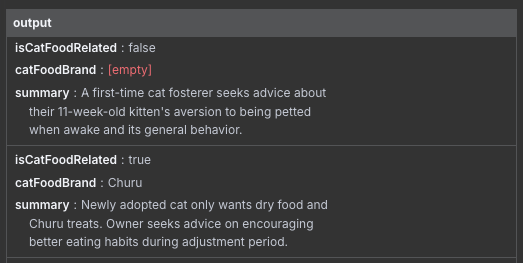
Now that our node is configured, let's run it! Given that we have 105 items, this may take a while, so chill for a bit. Once it's done, take a look at the Information Extractor's output.
Merging the Extracted Data With the Original
This is exactly what we want, but there is a problem. What about our other fields, such as the original title and body? Unfortunately, when we pass the post into the AI node, we lose the original post information. We could force the Information Extractor to copy them across, but that seems a) unreliable, and b) a waste of credits. It would be useful if n8n was able to do this, but currently it seems like that's not possible. As a workaround, we will use another node.
The Merge node is used to join two streams of data together. Unlike other nodes, it has two (or more) inputs and one output. What we want to do is to take our original posts, and merge them together with the data we just extracted. We note that both the original and extracted data have 105 elements, and they are in the same order. We can use this by combining these two sets of items together like a zipper.
Create a Merge node, and attach the output of the Information Extractor to one of the inputs, and the output of the earlier Filter node to the other. See the image below for how that looks.
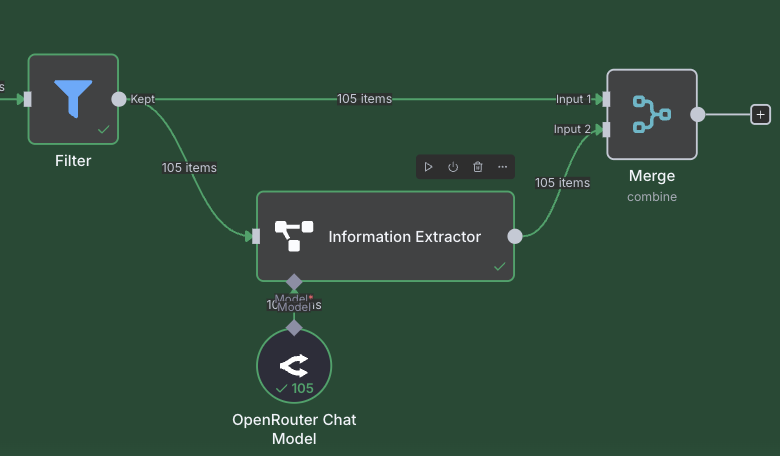
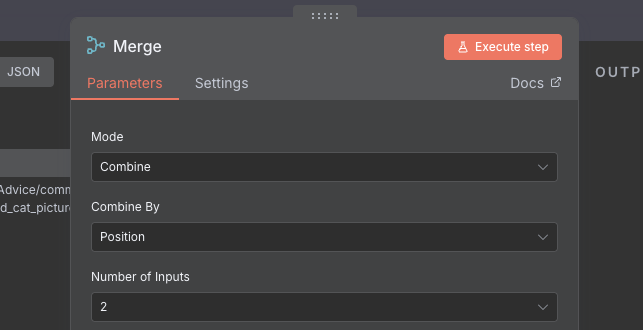
Double click on the node, and pay attention to how it is configured. We want to make sure to set the "Mode" field to Combine, and the "Combine By" field to be Position. This means that item 1 on the first input will be combined with item 1 from the second input, and so on. Also note that it is possible to have more than two inputs, which is quite a cool feature allowing you to merge together data from numerous different sources.
Run the node, and take a look at the out. We can see that we have 105 items, and the original post data is back which is great! However, we can see that the output from the Information Extractor node is nested in another key called output. I'll admit I find this a bit annoying, and I think n8n should have the option here of allowing you to have the keys you wanted as each item without the nesting, but it's not a massive problem, more of a cosmetic nuisance.
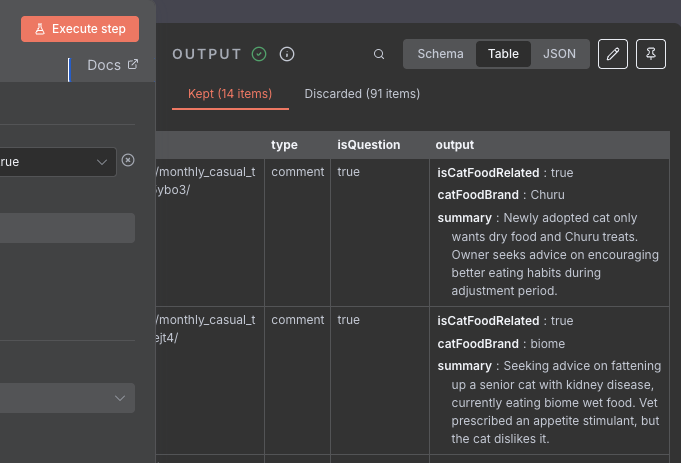
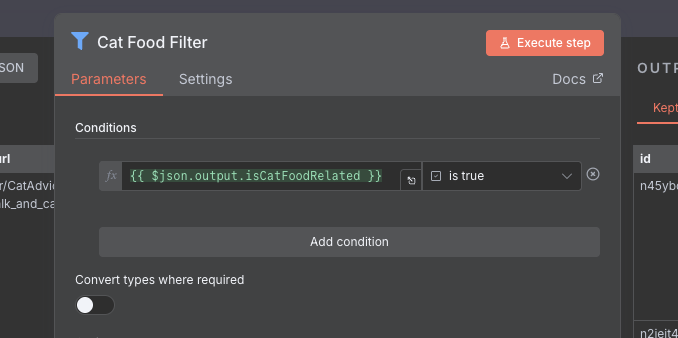
Looking through the data, we can see that a lot of the posts have the field isCatFoodRelated set to false, meaning that the model has decided they are not relevant to cat food. As before, we want to filter out any of the posts that aren't relevant. We will again use the Filter node to filter out any posts that are not relevant. See the image below for how to configure the node:
We have now finished the "Analysis" part of our task, and after having filtered out the relevant posts from the Information Extractor we are left with 14 posts. Looking through, we definitely have some good hits, with one comment for instance asking what food would be good for their older cat with kidney issues, which would definitely be relevant. However, we also see one or two posts that seem to only mention food in passing, but are actually talking about how their cat is more friendly before being fed. As with any AI related task, iteration is important here.
TIP
When building any kind of system, and especially one utilising AI models, it is important to test and refine your workflow iteratively. For instance, in the case of our cat food workflow, we could tweak the prompt to only mark posts as relevant if the choice of food is the main focus of the post.
Saving in Google Sheets
Our final requirements are to both write the posts we find to Google sheets, and to also send us a Slack message every time we find new posts. As usual, n8n provides us with nodes for the task. Let's start with adding rows to a Google sheet. Add the Google Sheets node, making sure to choose the Append rows in sheet sub-option, and connect its input to the output of the last Filter node.
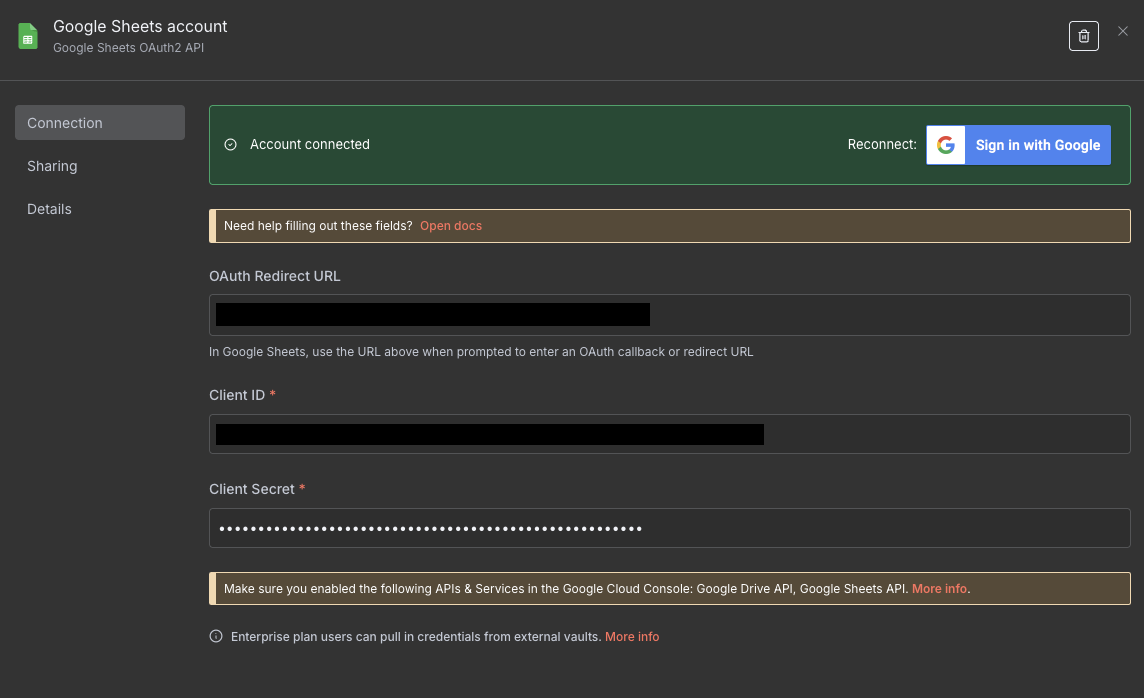
To actually use the Google Sheets node, we will first need to create a credential for Google. Double click on the node, and click Create new credential. You will need to create an OAuth client and secret using Google Cloud in order to use the API. Doing this is outside of the scope for this article, but the n8n documentation does a decent job of explaining how to do it, and you can find it here.
NOTE
As well as enabling the Google Sheets API like in the tutorial, you may also need to give access to the Google Drive API as well in order to be able to find the sheets. If you are having issues seeing your sheets, this may be the issue. In addition, I also found an issue where I was told I needed to verify my app. However, you can get around this by adding your email as a "test user". Go to Audience -> Test Users -> Add User on the google Auth Platform and add your email there.
WARNING
Whenever you create API keys and credentials, be very careful with them! In the wrong hands they can give malicious actors access to your data, the ability to spend your AI credits, or worse. Always keep these values hidden, and never share them with others when e.g. sharing workflows you have built.
Once you have your client ID and secret, paste them into the credential dialog, and make sure that n8n shows the account as connected.
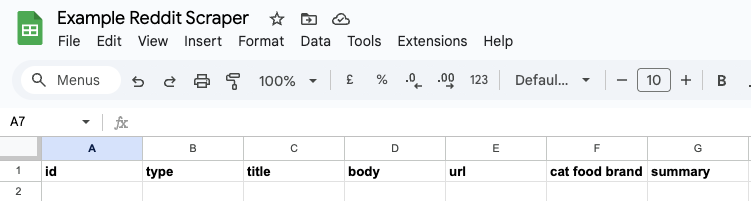
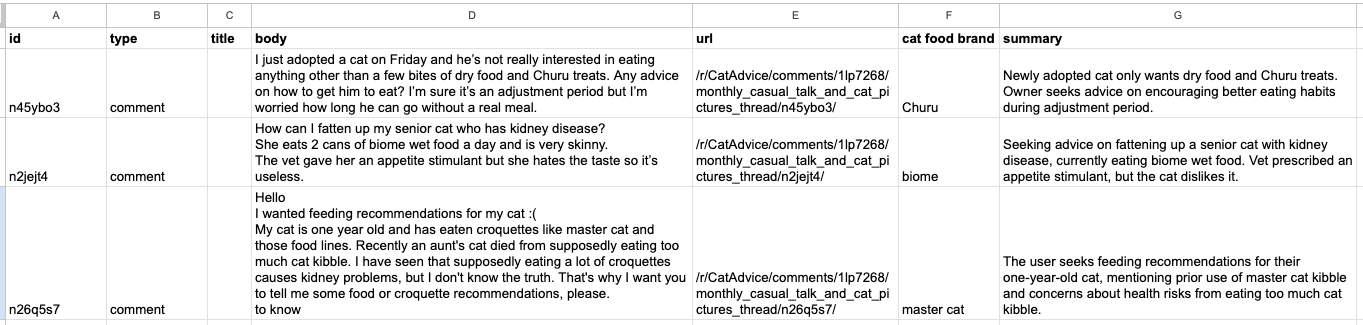
We now need to prepare a Google Sheet for our data. Go to Google Sheets, and create a new spreadsheet. We will need to create the columns first so that n8n knows where to put the data. On the first row, fill out the following column names:
id, type, title, body, url, cat food brand, summary
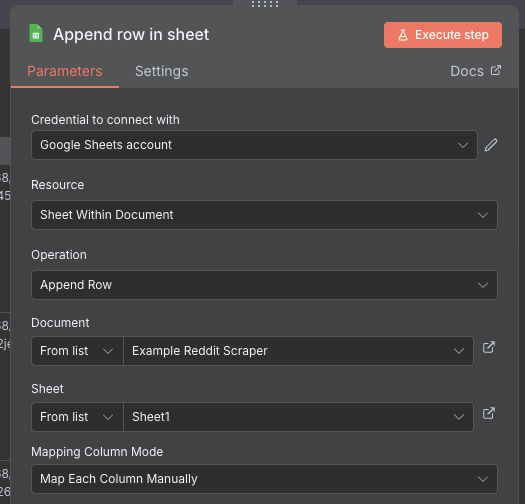
Once the names are in place, double click on the Google Sheets node. Select your credential you set up earlier, and choose Append Row as the "Operation". Then, click the dropdown for "Document" and choose the spreadsheet you configured earlier. For the "Sheet", just choose the first sheet unless you named it something else.
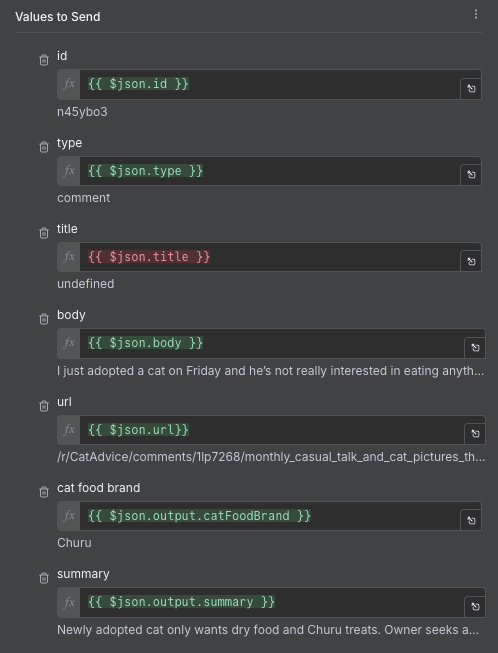
For the "Mapping Column Mode", choose Map Each Column Manually. This will allow us to have accurate control over what data goes where, and we will need that given our annoying nesting problem from earlier. For each field, use the expression syntax to choose the right data from the posts. For the nested values, remember to use the dot notation to get to it e.g. $json.output.summary.
We run the node, and then go to the Google Sheet we created. If everything worked correctly, you should be able to see the results nicely arranged in the table. We expand some of the columns and turn on word wrapping to make it a bit more readable.
Sending Notifications to Slack
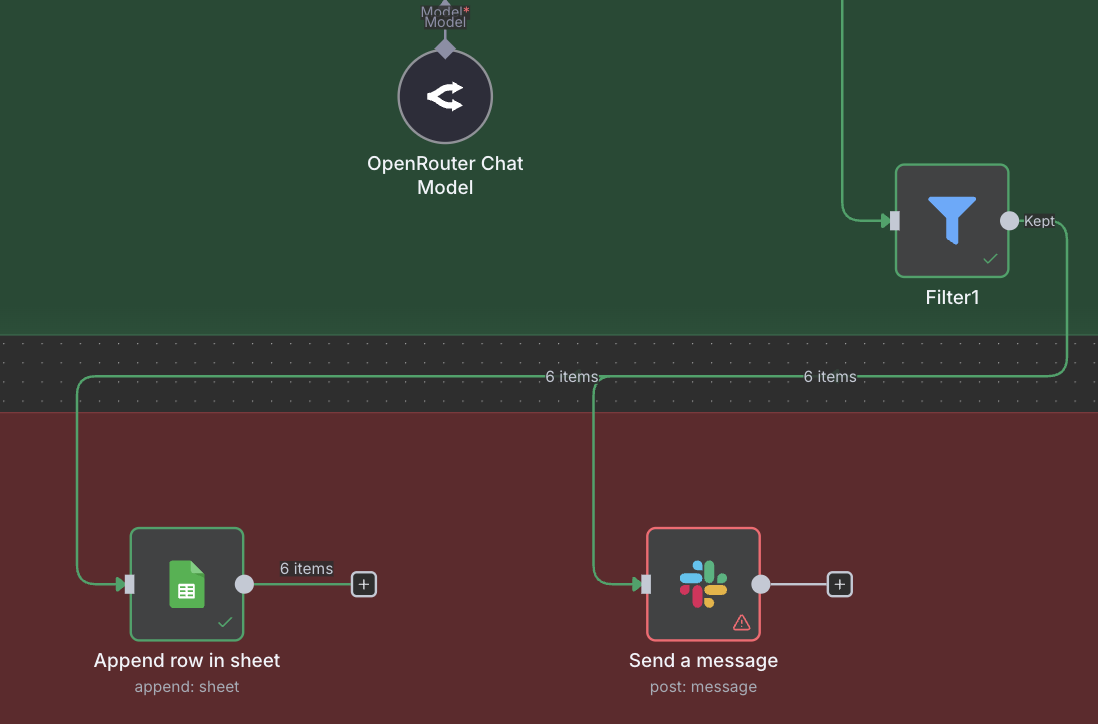
Now, we only have one requirement left. We need to send an update on Slack, notifying us that new relevant posts have been found. To do this, we will use the Slack node. Add the node from the menu, and attach it to the same Filter node that the Google Sheets node is attached to. As we can see, in n8n it is possible to connect more than one node to one input. In this case, the same output of the Filter node will go to both of the connected n odes, allowing us to carry out two different actions on the same data. In software development, this is sometimes called Fan Out.
Double click on the Slack node, to pull up the configuration. As with the Google Sheets node, we first have t o create a credential for Slack. n8n's excellent docs come in handy here, with their guide on setting up Slack credentials.
TIP
Compared to Google Sheets, I found configuring Slack rather annoying. I got stuck on the scope step especially long, adding the scopes one by one. Eventually I figured out that to be able to view user channels, you need to have channels:read and somewhat more strangely, groups:read. In order to be able to post, you must have channels:join, chat:write and chat:write.public.
Once your credentials are configured and tested, let's set up the rest of the options for our Slack node. First, go to your Slack app, and create a new channel. We will call ours #reddit-cat-food-posts. Once you have done that, you will need to set the node up to be able to write to the channel. Take a look at the (rather long) image below to see the details.
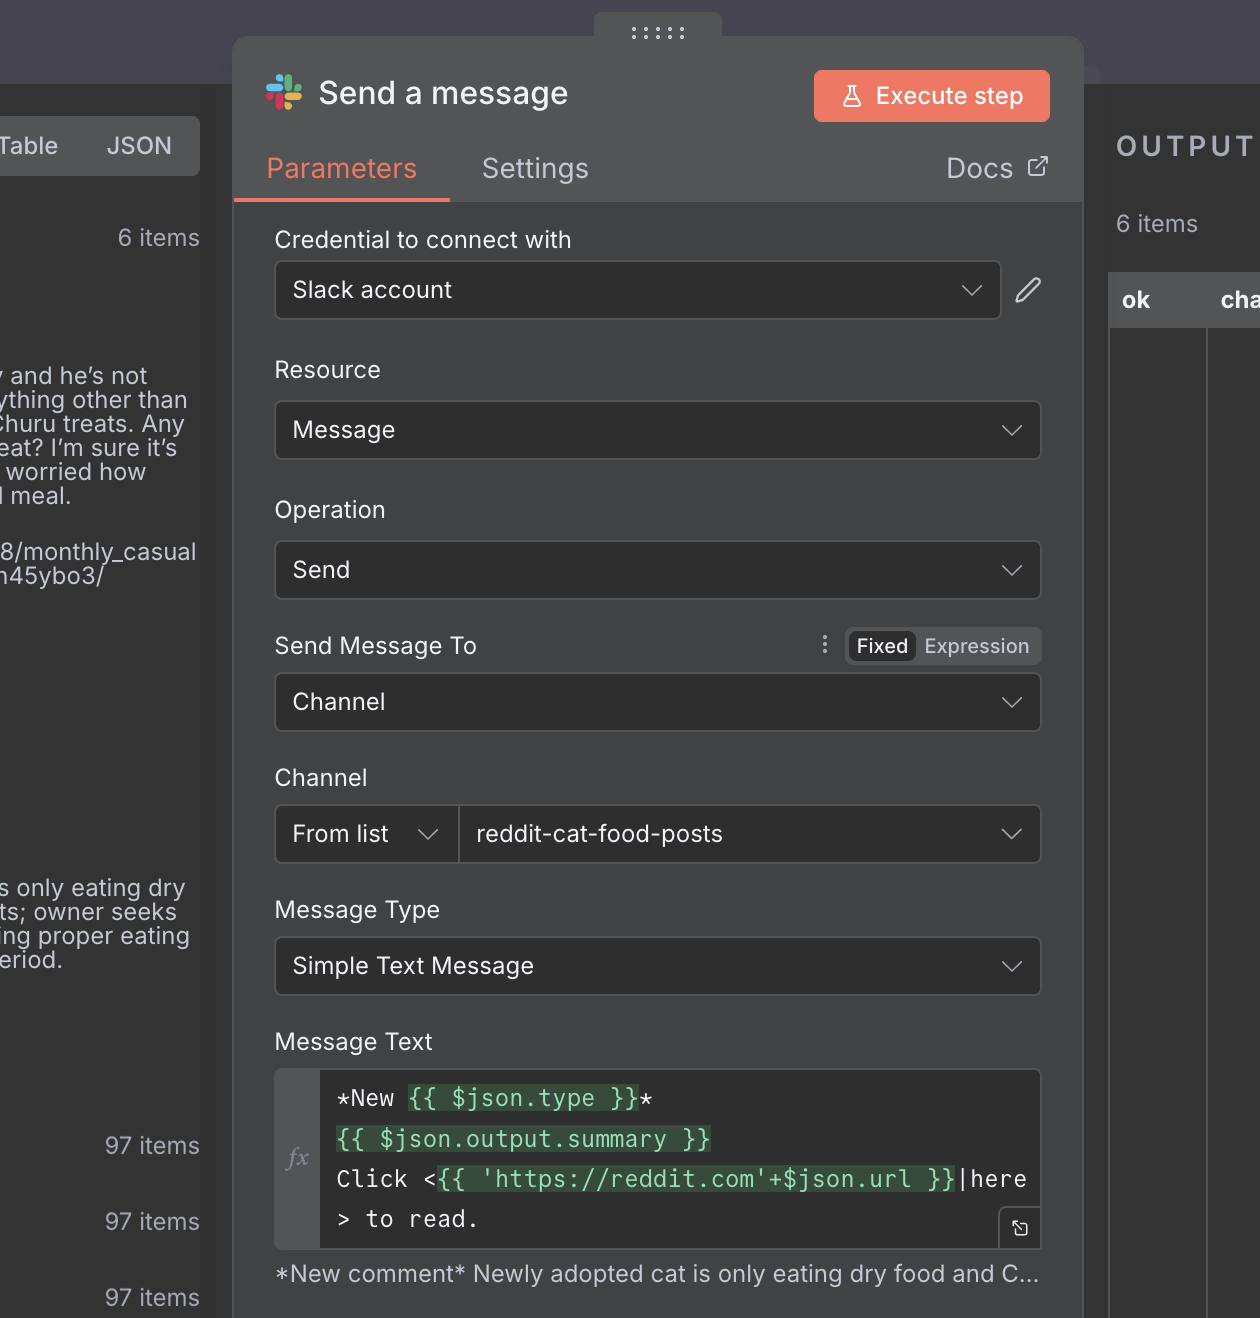
Of importance are the choice of channel, and the Message Type & Text. We will be sending a Simple Text Message which also usefully supports Slack's markdown syntax for rich text editing. We also fill out the message text to send our summary and link so that we can at a glance see what the post is about, before we click the link. As before, we make use of the expression syntax to fill in the bits we need. You can see the full message text below:
*New {{ $json.type }}*
{{ $json.output.summary }}
Click <{{ 'https://reddit.com + $json.url }}|here> to read.
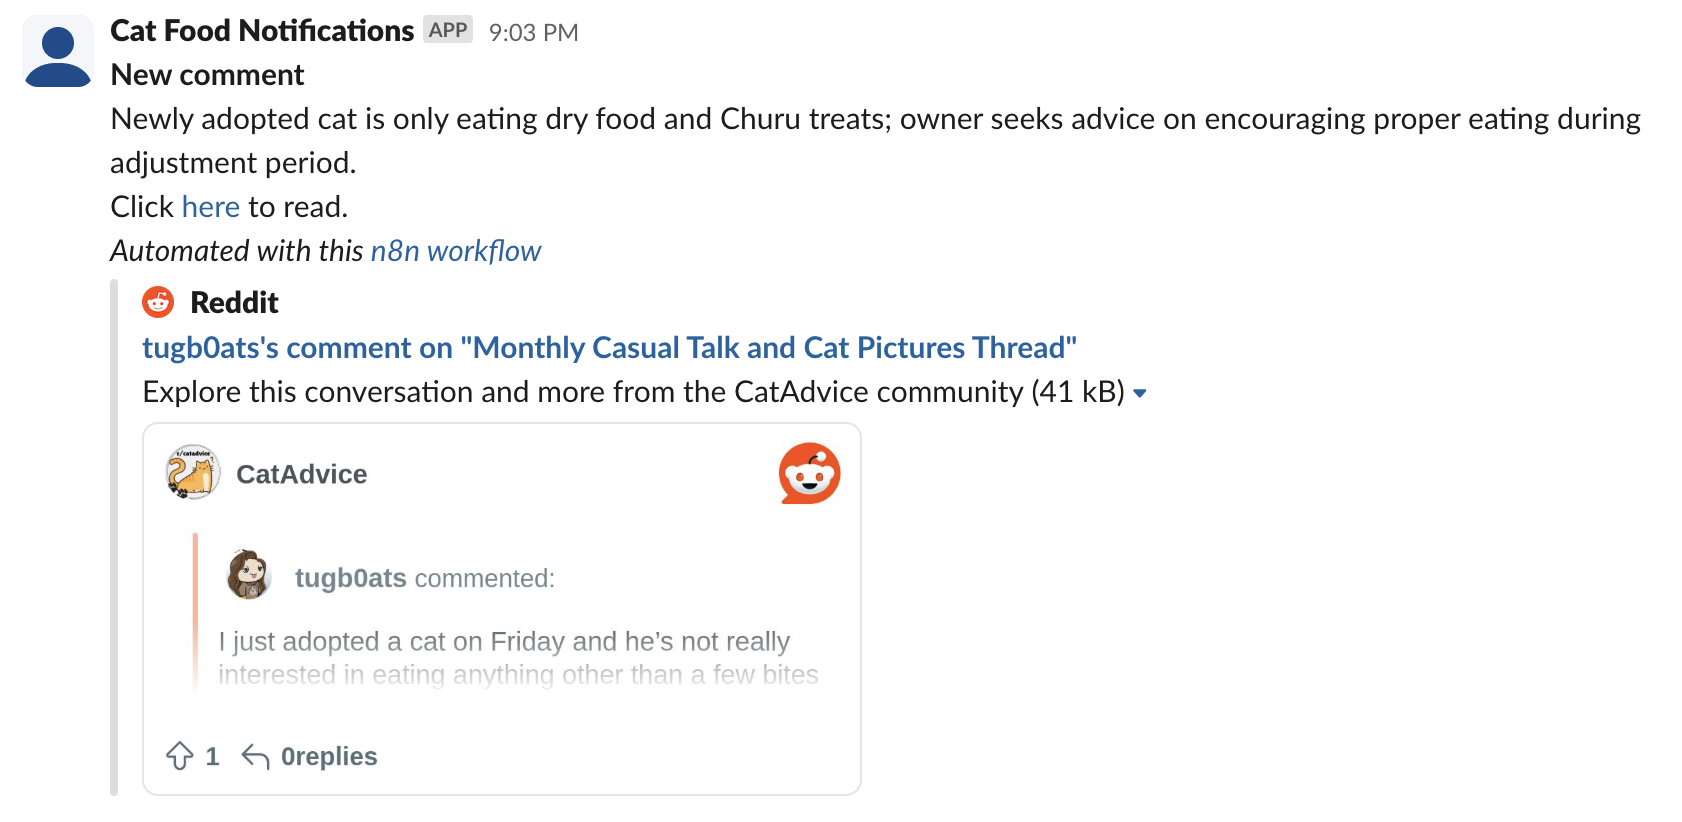
Run the step, and then check your Slack app. if everything has gone well, you should see a slew of messages notifying us about the new cat food related posts that we just scraped.
Implementing De-Duplication & Idempotency with Redis
That's it! We're done! We now have fulfilled all of our requirements. However, those who perhaps are more developer inclined might have spotted an issue. To see it in practice, try running the full workflow twice. What you will notice, is that suddenly there are duplicate posts and comments in the Google Sheet and on Slack.
Why is this happening? The reason is that every time we run the workflow, we get the top posts and comments. However, if we run it a short time after, it is unlikely that there will be 10 new posts at the top, and instead there may be one or two new posts, and the rest will be the same. Our workflow however, has no way of knowing this!
In order to prevent this, every time we get the raw posts and comments from the API, we need to check if we have seen them before. That's going to require a "cache" of some kind to store posts that we have seen. Now we could just use google sheets, but that is not really a database, and is not particularly efficient at looking up data quickly.
Instead, we will use Redis, a fast key-value store that is a staple of the tech world. You can think of Redis like a hosted JSON file. You have keys, and each key has a value. You can add keys, remove keys, and also read keys. A bit like this:
{
  "key1": "value1",
  "key2": "value2",
  "key3": "value3",
}
You can of course host your own, but we don't need much for our project, so we can go with the easy option and get a free 30MB instance on Redis Cloud. Go to their sign up page, and register an account. Once you are signed up, click New Database to get started.
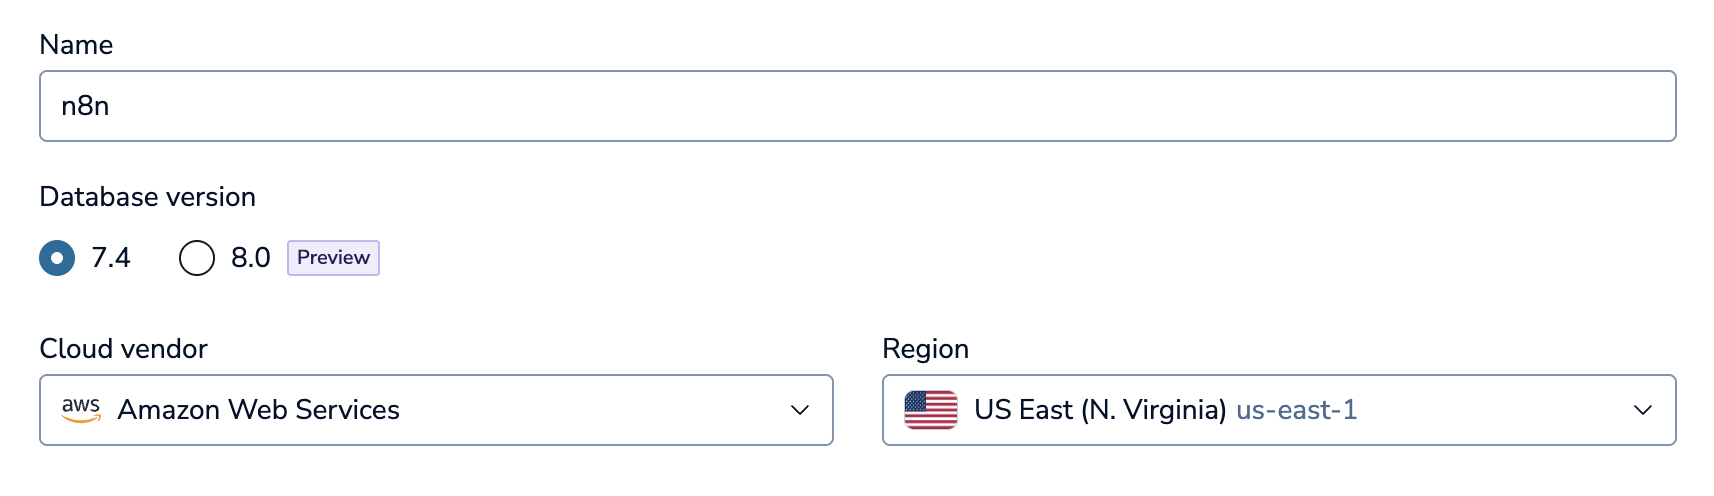
Make sure to click the Free plan, and give your database a memorable name (I just used n8n). The rest of the settings don't matter too much, so just do the same as the image above. Click Create Database, which will start the process of spinning up your Redis database.
While that's happening, we are going to need to add a Redis node to our workflow. However, this is going to require us to make some changes earlier in our workflow. We have a choice of where to remove the duplicates. We could do it after we get the comments, after we use the Code node to find questions, or after we use the Information Extractor to pass the posts to the AI.
When building systems like this, we want to think of trade-offs. For every post we collect, we must call the Redis node to check if we have seen it before. We could put it at the very end after the Information Extractor node is run, but by that point we have had to call the AI over 100 times, which is expensive. If we put it right at the start, after we get all of the raw posts (close to 500), then we will need to call Redis several hundred times which is slow, and also potentially might hit Redis' rate limits. Therefore, we will go with the middle option, and check for duplicates after we run the Code node that looks for questions, and cut the number of posts down to ~100. In my eyes, running code is cheap and fast, while calling APIs is slow and expensive, so this offers a happy compromise.
Here we will be deleting and modifying connections between nodes (by clicking the trash icon) so that we can create the new structure.
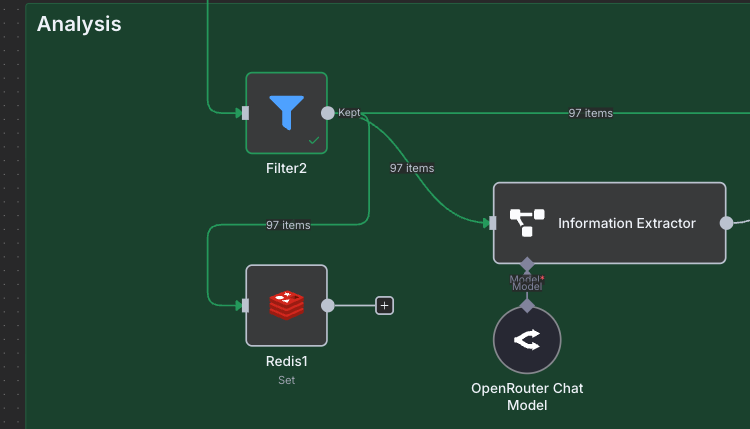
We are going to branch out the output of the full set of posts to the Redis node, and back into a Merge node and then Filter. This is similar to how we worked with the Information Extractor node, but requires a bit of "remodelling". Watch the video below of how to set it up.
Make sure to arrange everything to satisfy your OCD (or lack thereof), and double click on the Redis node to start configuring it. As before, we first start with the credentials, so click Create New Credential. By now, the Redis database should be up, so go back to the page, and go to the Databases page. Click connect on your database, and then click on Redis CLI.
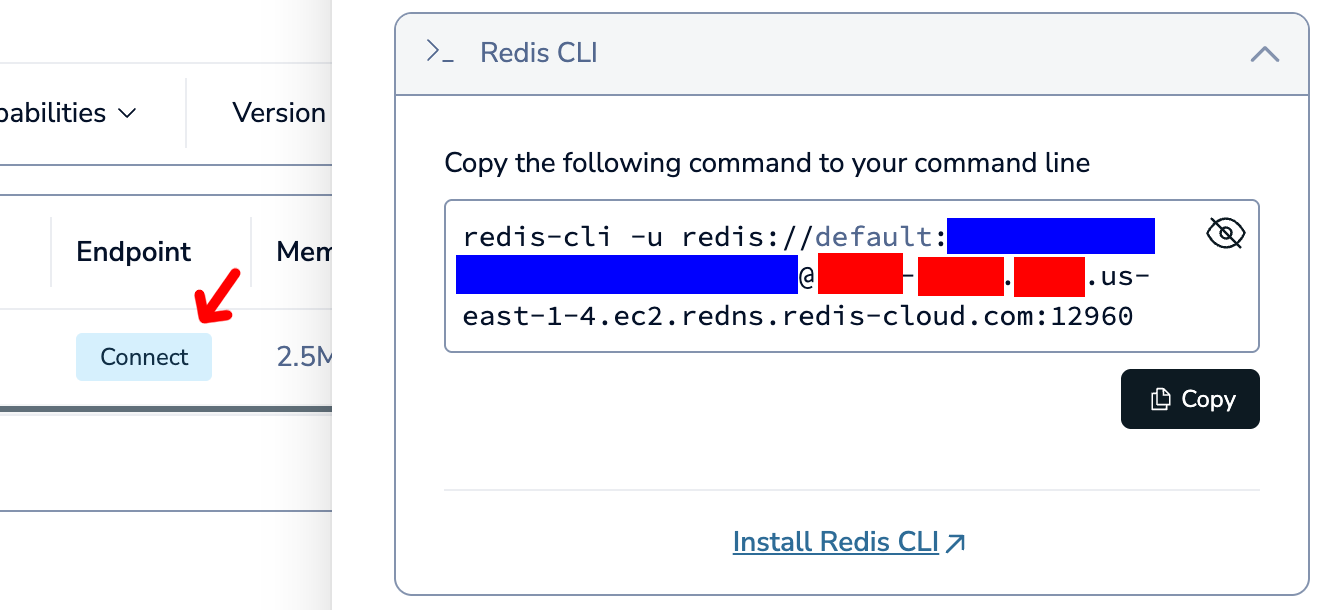
I am not sure why Redis Cloud doesn't just give you an easy page to get these credentials, but instead it seems you need to get the details by picking apart the Redis CLI command that they provide. You will get a string that looks something like this:
redis-cli -u redis://{username}:{password}@:{hostname}:{port}
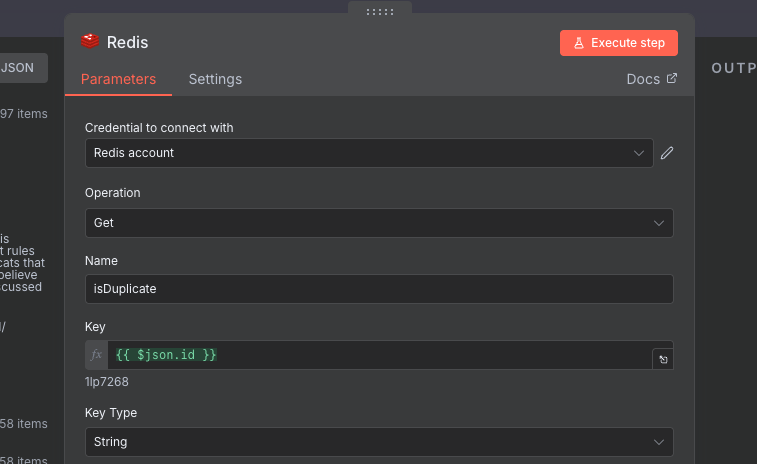
Pull out the individual pieces, and fill out the credentials page for Redis. For Database Number just choose 0, and make sure SSL is disabled. If you did it correctly, the test should say that it was successful. Now that the credentials are done, we need to configure the rest of the options. We are getting a key from the database, so choose Get as the Operation. For the Name choose, isDuplicate. This is the name of the field that will be sent out in the output with the results of the Redis call.
For the Key we will use an expression, and use our post's ID as Reddit makes these values unique. For the Key Type we can just choose String. Execute the node, which may take some time. Once it is completed, you should get a table of nulls. This is expected, as we haven't put anything in the database yet.
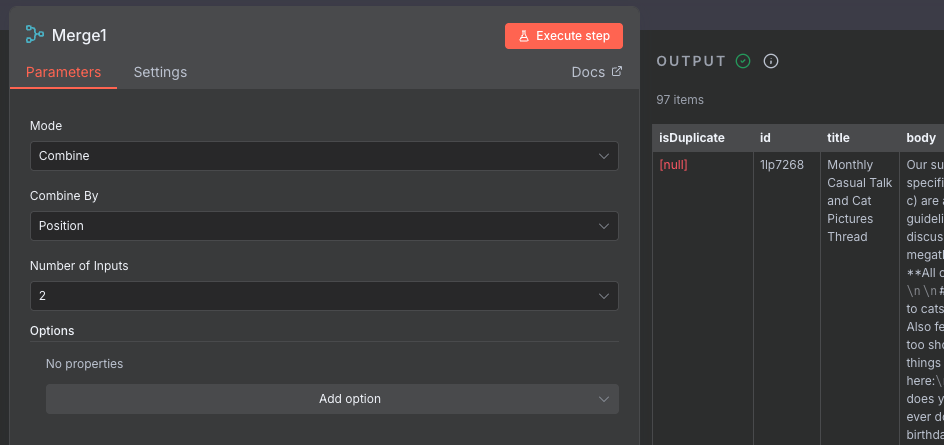
Next up, the new Merge node. We will configure it the same way as the other Merge node we had, and have it Combine items By position to join our items together. Looking at the output, we see that we now have the isDuplicate field set on all of our posts.
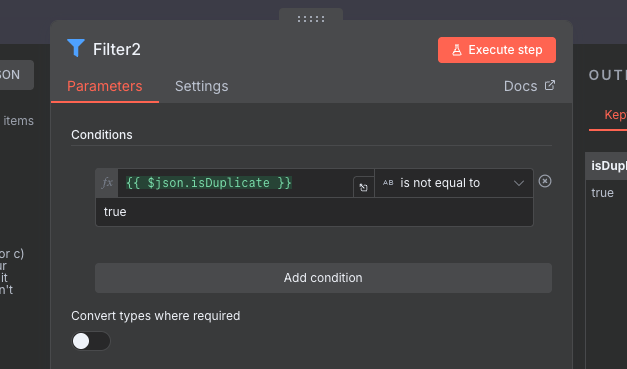
Finally, we will configure the new Filter node which is placed just before the Information Extractor. Here, we want to filter out any duplicates. We haven't yet handled tracking the duplicates, but when we see a key present, it will have a string value of "true". Annoyingly, there doesn't seem to be a is null condition on the Filter node. Instead, we will make sure that isDuplicate is not equal to "true", which achieves the same.
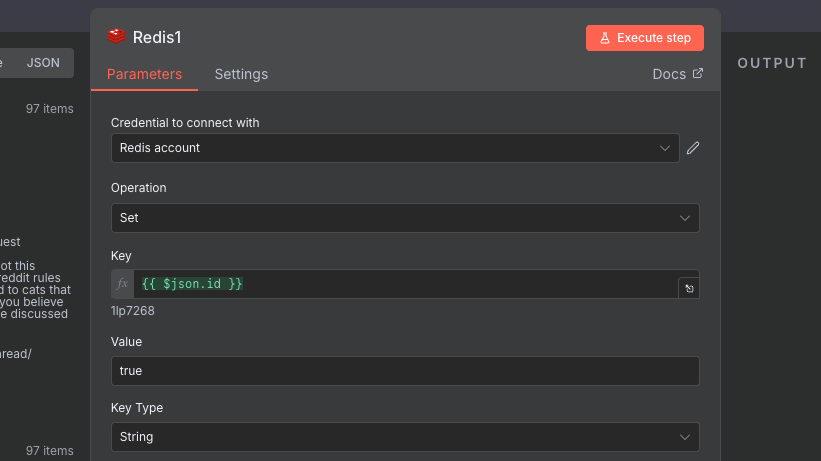
If you run your workflow now, you will see that all of the posts still go right on through. This is expected, due to the fact that we are not tracking the duplicates. To do this, we need to make sure that every time we analyze a post, we add it to our Redis cache. To do this, we will add another Redis node, with the Set Value of a Key sub-type. We will connect it to the Filter node, just before the Information Extractor. See the image below for the exact setup.
To configure this node, we will use the Set Operation. The Key should be the post ID, and the Value should be always true. For the Key Type choose String.
The purpose of this node, is that after we remove the duplicates in the earlier part of the workflow, we will be left with new posts. We send those new posts to be analyzed by the (expensive) AI, and at the same time we make a record in our Redis cache of their ID, so that we know if we have seen them or not.
WARNING
We never set an expiry on our keys, so at some point our Redis database might fill up and run out of memory. Dealing with this is out of scope for this article, but there are ways of mitigating this such as expiring keys, or choosing a much larger Redis instance.
Execute the redis writing step, which will put all of our ~100 posts into the cache. Now that our cache is seeded, try running the workflow again. You should now see that when we reach the part where we check for duplicates, the number of posts returned should be only a couple or close to zero. Running it one more time should result in even fewer or zero posts.
By adding the additional steps with Redis, we have added de-duplication, but also idempotency, meaning that we can run the workflow with the same posts over and over again, and it won't have any side effects.
Setting Up Scheduling
We are finally (really) done, and the only thing left is to set up our workflow so that it runs periodically. When running in production (for real, not just testing) we need to have things run automatically. As an example, we can set up our workflow to run every hour.
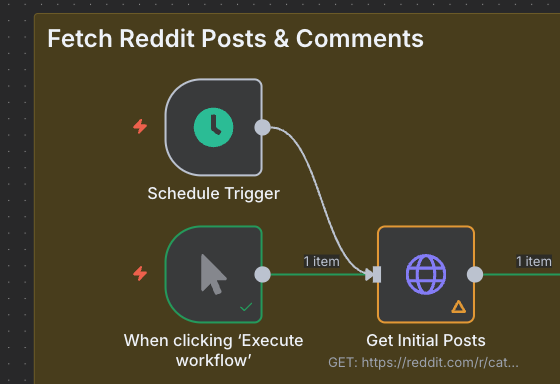
Add a new node, and choose Add another trigger, then add a On a schedule node. Much like the Trigger manually node, we attach the output to the start of our workflow, which is the HTTP Request node.
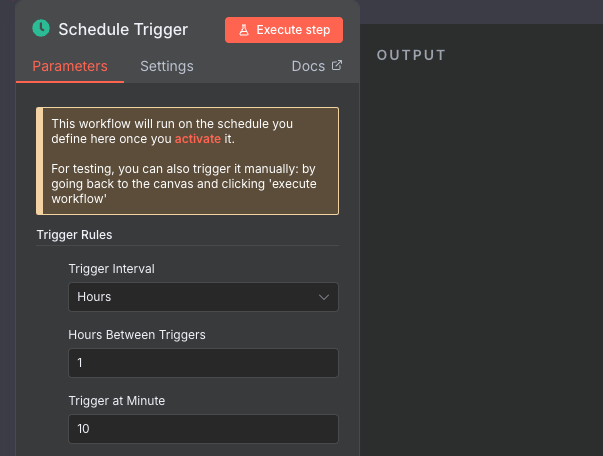
We will configure it to run every hour, 10 minutes past the hour.
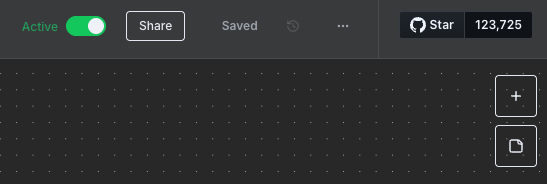
The only thing left to do is "activate" the workflow, to allow the timer to run the schedule. Once this is done, our workflow is live! Flip the Active toggle on the top left of the workspace to on, and it is done!
To see the results of our runs once we come back to them later, you can look at the Executions tab at the top. Every time a run occurs, you can go back through and see what happened. This is a useful feature for debugging when something goes wrong.
Conclusion
Putting even a simple workflow like this together shows that even simple things can have surprising depth when you think about all of the compromises and edge cases. Overall, I found building a workflow in n8n quite an intuitive experience, especially if you have a software development background. The connection of nodes with inputs and outputs was generally familiar, and the configuration options were logical and flexible.
I liked the fact that the nodes available were well organised, and also covered a variety of different external services. I do think that there are a few small things missing, for instance having the Key Exists operation for the Redis node, or having a clean way to enrich data using external services without having to do the 3 node Merge dance which in my opinion could just be an additional option.
Is this a good choice for absolute beginners with no automation or software development experience? Maybe. The documentation online is quite good, and n8n does have a beginner intro workflow that you can build. On the other hand, I think that in order to do more complex things, such as the de-duplication and idempotency we put in, it requires some experience in logical problem solving. In software, these are known as Design Patterns, and perhaps n8n needs some tutorials in common patterns to use, and maybe even replace them with specific nodes.
Finally, I was quite impressed by both the customisation and the self-hosting options. Though the community version is somewhat cut down, it does provide a very much usable version of the product that can be used by those comfortable with setting up the hosting and configuration themselves. Though I didn't make use of it this time, n8n also offers options for writing custom nodes in TypeScript, which is definitely useful for power users.
You can also find the JSON for this workflow on GitHub, in case you want to try it yourself. I hope you found this review / tutorial useful! Should you have any comments or criticisms, I'd love to hear from you. Happy automating!
Frequently Asked Questions
How do I scrape Reddit posts with n8n?
The simplest method is to use the Reddit JSON API, which requires no credentials. Append .json to any Reddit URL and you get back structured JSON data. For example, https://reddit.com/r/catadvice.json returns the latest posts from that subreddit. In n8n, add an HTTP Request node with that URL and it will fetch the data directly. This approach works for read-only access and is rate-limited to around 10 requests per minute for unauthenticated calls. Note that Reddit changed their API access policy in late 2025. For more detail, see our Reddit API access guide.
Can n8n connect to Reddit without OAuth credentials?
Yes, for reading public data. As described in this tutorial, the .json endpoint on any public Reddit URL returns post and comment data without any authentication. This covers the majority of monitoring and scraping use cases. If you need to post, vote, or take any account action on Reddit, you will need OAuth credentials, which now require approval from Reddit under their Responsible Builder Policy.
How do I prevent duplicate posts in an n8n Reddit scraping workflow?
The approach covered in this tutorial uses Redis as a fast key-value store. Before passing a post to your AI analysis step, you check Redis to see if the post ID has been seen before. If not, you process it and write its ID to Redis. On subsequent runs, those IDs are already in the cache and get filtered out. This also makes the workflow idempotent: running it multiple times with the same data has no side effects. Redis Cloud offers a free 30MB instance, which is more than enough for this kind of deduplication.
How do I use AI in an n8n workflow without it getting expensive?
The key is to filter your data down as aggressively as possible before sending anything to an AI model. In this tutorial, we used a simple JavaScript code node to flag posts that are likely questions (using question marks and question words) before passing them to the Information Extractor node. This cut 472 posts down to around 105, saving roughly 78% of AI API calls before any credits were spent. Any cheap, deterministic pre-filtering step you can add upstream of an AI node will significantly reduce costs.
What is the n8n expression syntax?
n8n uses JavaScript expressions enclosed in double curly braces to reference data from previous nodes. For example, {{ $json.data.permalink }} accesses the permalink field from the current item's JSON data. Any configuration field in any node can use this syntax, which makes it easy to build dynamic values from upstream data without writing a full Code node. If you need more complex logic, the Code node lets you write full JavaScript or Python.
Can n8n send Slack messages as part of a workflow?
Yes. n8n has a built-in Slack node that supports sending messages, creating channels, and reacting to Slack events. In the workflow from this tutorial, we send a formatted Slack message with a summary and link for each relevant Reddit post found. One thing to note when setting up Slack credentials in n8n: you need specific OAuth scopes including channels:read, groups:read, channels:join, chat:write, and chat:write.public to be able to read channels and post messages.