- Published on
Creating & Automating Short Form Videos Using n8n
- Authors
- Name
- Chris
- @molehillio
Introduction
Short video content is hugely viral at the moment. The platform's algorithm favors it, creators are seeing millions of views, and platforms like Instagram Reels and Facebook Reels are hungry for content too. But there's a catch: creating high quality short form video content consistently is time consuming, expensive, and skill intensive.
Most creators face a dilemma. Either they spend hours manually scripting, filming, editing, and uploading videos to multiple platforms, or they pay hundreds of dollars monthly for tools like Sora 2, which (let's be honest) still require plenty of manual work. And if you're in Australia, Brazil, or dozens of other countries, you don't even have access to Sora 2 yet. What if you could automate the entire process?
The rise of accessible AI models, combined with platforms like n8n and Make, has made it genuinely possible to build an end-to-end YouTube Shorts automation workflow without breaking the bank.
In this article, we will cover a basic approach to using workflow automation and both text and video AI models in order to generate short form videos. The goal here isn't to be clever, but to show you a bare bones set up that you can then expand on.
This article contains affiliate links. If you sign up through our links, we may earn a commission at no extra cost to you.
Table of Contents
- What We're Building: A Short Form Video Creation Pipeline
- Why n8n? Why Not Use Make or Zapier?
- The Tools You'll Need (Most Are Free)
- Building the Workflow: Step by Step
- Next Steps
- Frequently Asked Questions
- Can n8n automate the creation of short form videos?
- What AI video generation models work with n8n?
- How much does it cost to automatically generate short form videos?
- Can I add AI voiceovers to automatically generated videos?
- Why use n8n instead of Make or Zapier for video automation?
- Is it safe to use the Google Sheets trigger for video automation workflows?
What We're Building: A Short Form Video Creation Pipeline
Before we dive into the technical details, let's clarify what we're actually building here. We're creating a workflow that:
- Takes short ideas or prompts from a simple source (like Google Sheets)
- Automatically generates a script using a large language model like ChatGPT or Claude
- Creates a video based on that script using AI video generation
The beauty of this approach is that it removes the manual bottleneck. Instead of spending 30 minutes to an hour creating a single short, you can batch-create dozens of video ideas, let the automation handle the heavy lifting, and focus on strategy and optimization.
Why n8n? Why Not Use Make or Zapier?
We'll be using n8n for this tutorial, mainlly because it has an easy to use interface, and the self-hosted version is great for testing out ideas before getting them live. Check out our tutorial and review if you want to learn more about that in depth.
That said, if you prefer Make or Zapier, the core concepts here will translate directly; you'll just need use their modules instead of n8n's. If you want a practical Make workflow walkthrough first, see our Reddit scraper tutorial in Make.
The Tools You'll Need (Most Are Free)
Let's talk about the actual tech stack. Here's the good news: most of this is either free or has generous free tiers.
n8n
This is your orchestration layer. It connects everything together. n8n offers several pricing tiers starting with their Starter plan at €20/month (billed annually), which includes 2,500 executions per month—enough to get started with this tutorial. For higher volumes or self-hosted options, check out our complete pricing breakdown.
Google Sheets
Your data source. Free. You'll put your video ideas here, and n8n will pull from it.
Claude API or ChatGPT API (or really any model)
For script generation: to be honest, any model can be used here. I am quite favourable to Claude Sonnet 4.0, or Google Gemini Flash 2.5 if you want to save money. For the size of scripts you are generating, arguably the cost here is irrelevant; it's a few cents at most. For even better results, you can consider using a deep research model like Perplexity which can carry out internet searches and other research tasks.
Video Generation Models
Here's where it gets interesting. If you have access to Sora 2, great. But if not, Google Veo 3 is a good choice. It's available through the Gemini API free tier, though with some limitations. Runway Gen-4 offers a free plan with 125 monthly credits (roughly 25 seconds of generation). Luma Dream Machine offers a free tier with limited generations. Kling offers free credits too, though with longer waits on the free tier. Stay tuned for an in depth review of these options in the future!
ElevenLabs or Similar (Optional)
If you want AI voiceovers, ElevenLabs' free tier gives you 10,000 characters per month and has a pretty wide range of voices to choose from as well as custom voice creation. We won't be covering it in this tutorial, but stay tuned for a follow up tutorial.
Building the Workflow: Step by Step
Let's walk through the actual workflow, step by step.
Step 1: Set Up Your Data Source
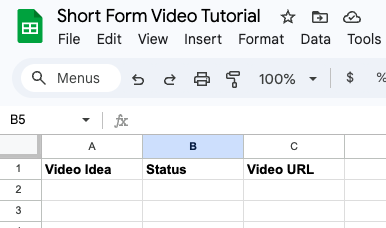
We will be using Google Sheets as our data source. While not exactly "enterprise scale", for a simple set up it offers a very convenient database + user interface. Create a Google Sheet with three columns:
- Video Idea - A short description of what you want the video to be about
- Status - Whether it's "Pending," "Processing," or "Completed"
- Video URL - Where the final video will be stored
You'll manually add video ideas to this sheet. For instance, if you're in the fitness niche, you might add ideas like "5-minute morning workout routine" or "Common gym mistakes beginners make." The automation will pick these up and process them.
We'll need some test data, so we will go with a simple video idea for some simple gym content. For the video idea, we will use:
Top 3 excercises for building upper body strength. Focus on the excercise, and the benefits and how it helps build upper body strength.
Add this into the idea column, and make sure put Pending in the status field.

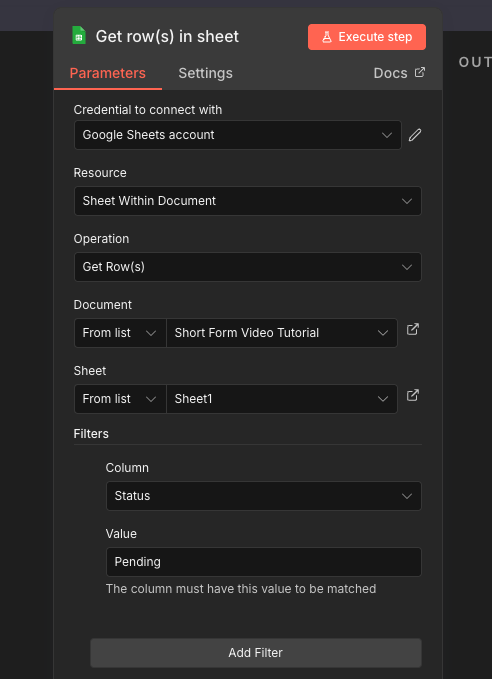
Step 2: Create Your n8n Workflow Trigger
In n8n, create a new workflow and set a trigger. You can use various triggers here depnding on what you want to do:
- Webhook trigger: Manually kicks off the automation allowing you to integrate your workflow into other applications
- Schedule trigger: Runs automatically once per day or at specific intervals
- Google Sheets trigger: Watches your sheet for new rows as soon as they are added.
For a batch operation, a schedule trigger works great. For instance, you might set it to run every evening, grabbing all "Pending" ideas from your sheet. In this case, we will use the Schedule Trigger as this gives you flexibility in batching and generating videos in groups if needed.
WARNING
Be careful using the Google Sheets Trigger. You may find that as soon as you type in any field, even a few words in the idea column the workflow will trigger causing your workflow to run on a partial idea! We will cover how to do deal with this later.
Step 3: Fetch Pending Ideas & Mark Them As Processing
Add a Google Sheets -> Get row(s) in sheet node to your workflow. We will use this to get any rows which are in the Pending state. Set up you triggers to connect to the Google Sheets node.
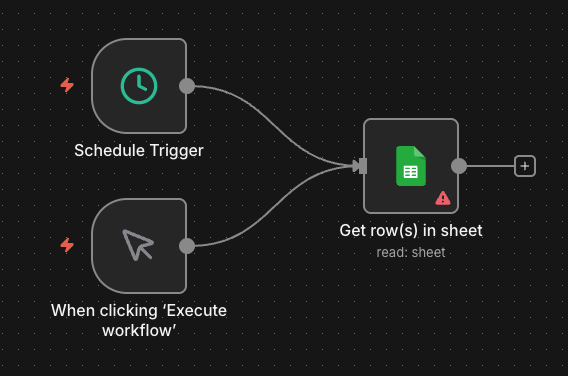
You will need to set up your Google Sheets node to connect to your sheet. In order to do that, you will need to set up the OAuth credentials for google. You can find detailed instructions on how to do that in our n8n tutorial.
Choose your spreadsheet from the dropdown, and make sure to add a filter to check that the Status column is equal to Pending. This will mean that we get all of the ideas that we haven't processed yet.
Run your workflow by clicking the Run Workflow button. If all went well, you should see your sheet appear as a JSON payload in the results box. Once we get our list of ideas, we want to mark them as Processing. This prevents the script running twice and accidentally generating a video for the same idea twice.
Attach a Google Sheets -> Update row in sheet node to the output of the first Google Sheets node, like this.
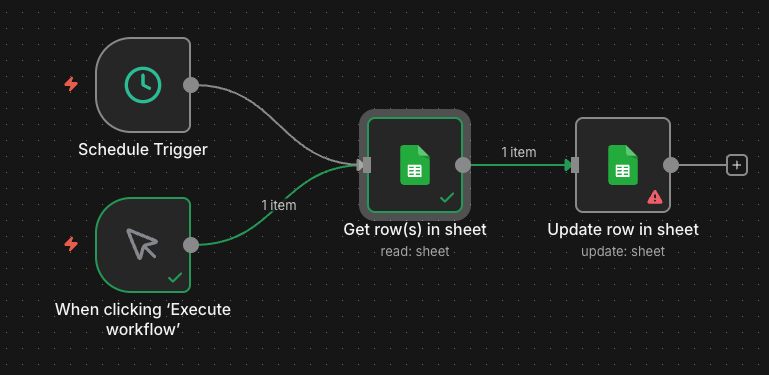
This time, we will configure the node to update the Status column to Processing. This acts as a "lock" so that this row is not picked up again by accident. Set up the node like the image below, making sure to match the row on row_number which is coming from the input.

Test your workflow again, and if you have done it correctly the Status in the idea should update to Processing. Make sure to set it back to Pending once you are done testing!
Step 4: Generate Your Script
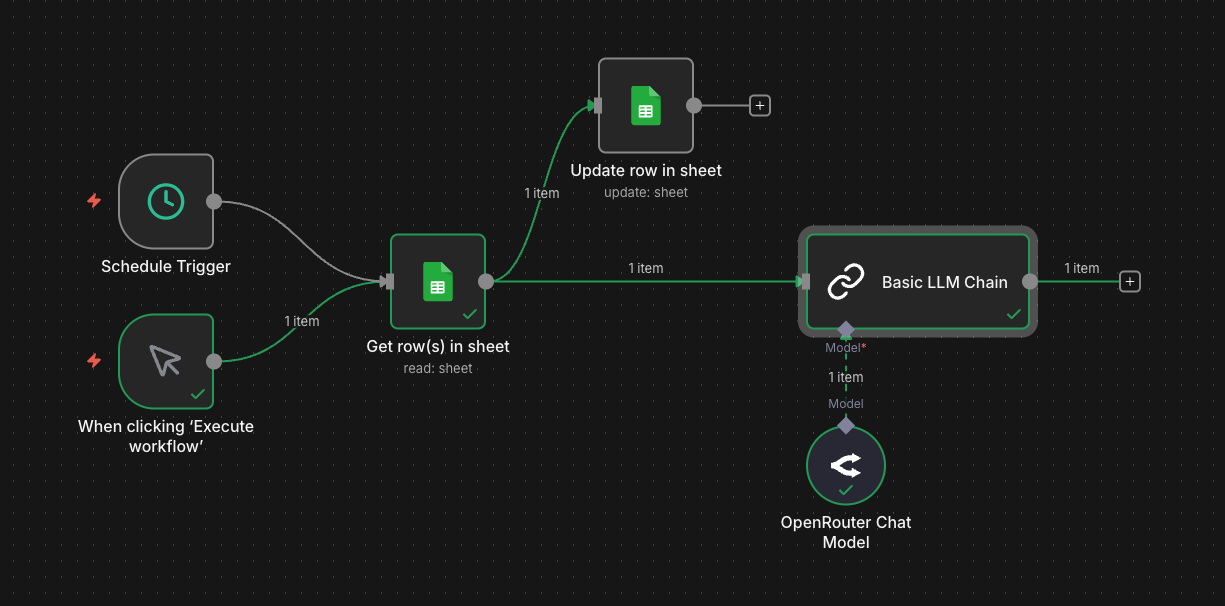
Now we need a node for calling our LLM for generating the script. We will use the Basic LLM Chain node in order to do this. Add the node, and connect it to the earlier Google Sheets - Get Row node, as we will need the video idea. For your model, connect whatever API you have available. In this case, we will be using OpenRouter, with the Gemini Flash 2.5 model.
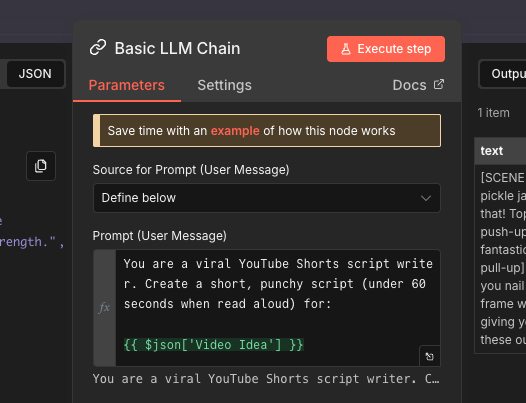
Inside the node, your prompt might look something like this:
You are a viral YouTube Shorts script writer. Create a short, punchy script (under 10 seconds when read aloud) for:

{{ $json['Video Idea'] }}

Requirements:
- Hook the viewer in the first 3 seconds
- Use simple, conversational language
- Include emotional triggers (curiosity, surprise, humor)
- End with a clear call-to-action
- Format: [SCENE 1] [Description] [Voiceover]

Return only the script, nothing else.
Remember to use the expression syntax to insert your video idea into the prompt. Run the node to test it, and you should have an example script in your results.
Step 5: Generate Your Video
Now for the interesting part: actually creating the video. This is where your choice of AI video generator matters.
As mentioned, there are many options for generating videos. Today, we will be using fal.ai which gives you access to several different models via the API. Sign up for an account on their website before continuing.
The model we will use is a reasonably priced one as we are just testing things out. Kling's fal-ai/kling-video/v2/master/text-to-video will do nicely for this. You can find the specs here. First things first, we will need to create a node to do a HTTP POST request.
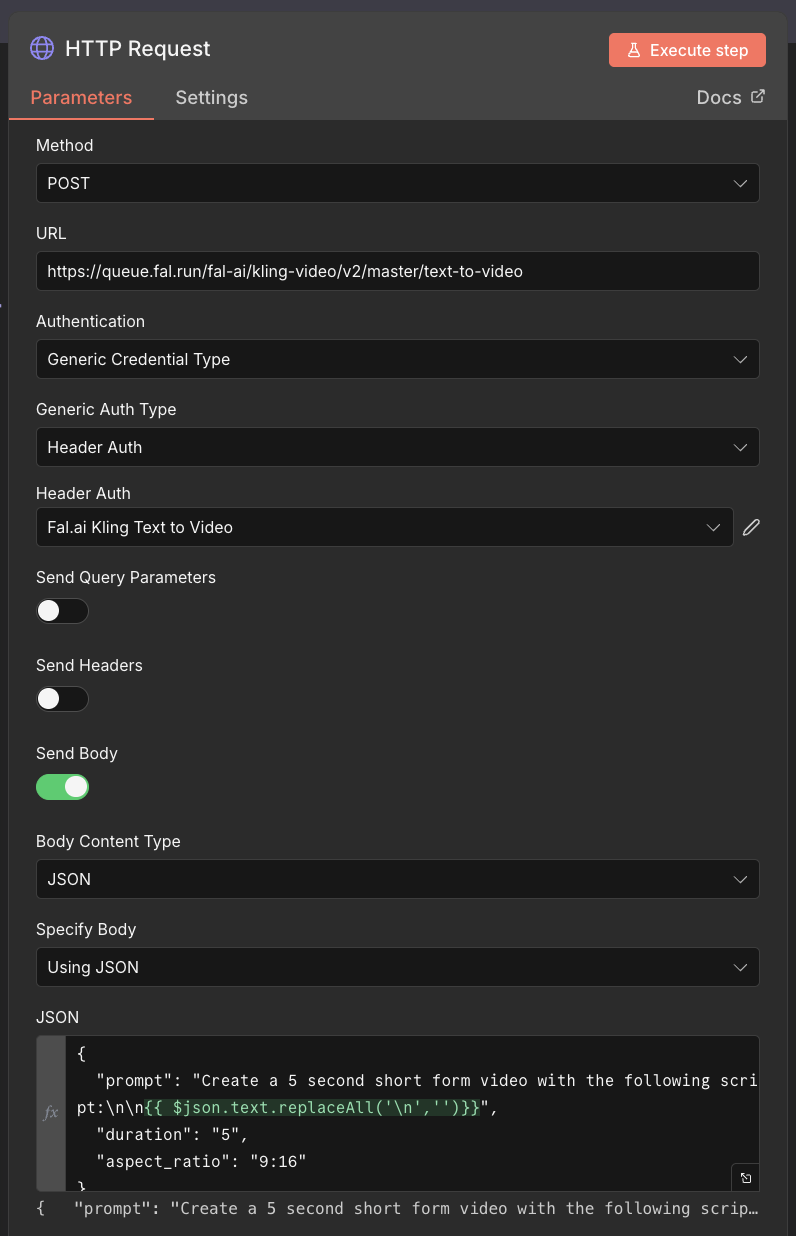
Create a new HTTP Request node attached to the right of the LLM node, and choose POST as the method. To get the URL, go to the API page for the model. In our case, the URL is:
https://queue.fal.run/fal-ai/kling-video/v2/master/text-to-video
We will then need to create an API key to use in our node. Create a key on the site, and then in the HTTP Request node select the Authentication field, and add a new Generic Credential Type -> Header Auth. Set Authorization as the name of the header, and for the key, you must put it in this format, with Key first:
Key abc123
This is assuming your key is abc123.

Back in the HTTP Request node, toggle Send Body to ON, set Body Content Type to JSON, and choose Specify Body as USING JSON. In the JSON text box, paste the following payload (you can also copy the base payload from fal.ai's API tab and modify it):
{
  "prompt": "Create a 10 second short form video with the following script:\n\n{{ $json.text.replaceAll('\n','') }}",
  "duration": "10",
  "aspect_ratio": "9:16"
}
NOTE
We're using 9:16 aspect ratio for YouTube Shorts (vertical format). The duration can be set to "5" or "10" seconds. We also use replaceAll in order to remove newlines that could cause problems with the JSON formatting.
We have the video creation set up, but now we actually need to get our results!
WARNING
From this point onwards be careful! Every run of your workflow might cause a new video to be created. This can get expensive fast, so it is reccomended to run your workflow with cached results from the video creation node to save credits.
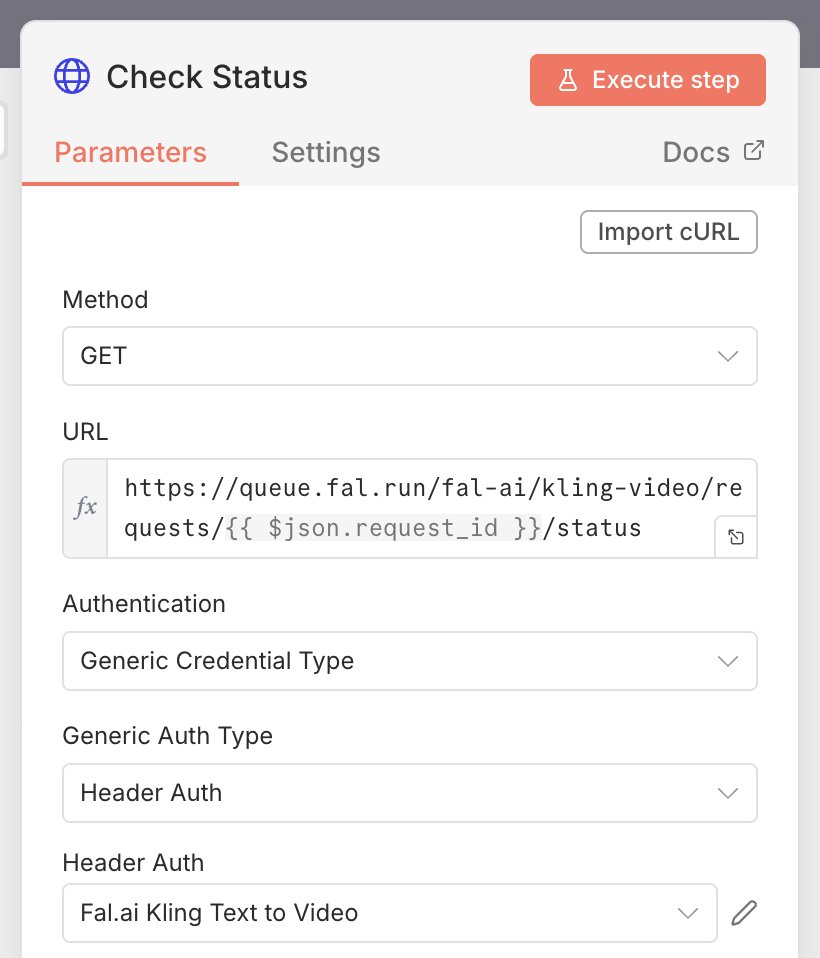
Next we need to check the status of our video creation. When we called the video creation HTTP endpoint, we got back a request_id. We can use this to see the status of our video.
Add a second HTTP Request node, this time with the GET method, and attach it to the end of the previous video creation request node. This node should be configured with the same credentials as the previous ones, but with the URL created from the result of the previous node. In fal.ai, go to your model's API section and find the GET URL for status checking. In our case, it is:
https://queue.fal.run/fal-ai/kling-video/requests/$REQUEST_ID/status
where $REQUEST_ID is the request_id from the previous node's result. Configure the node with this URL.
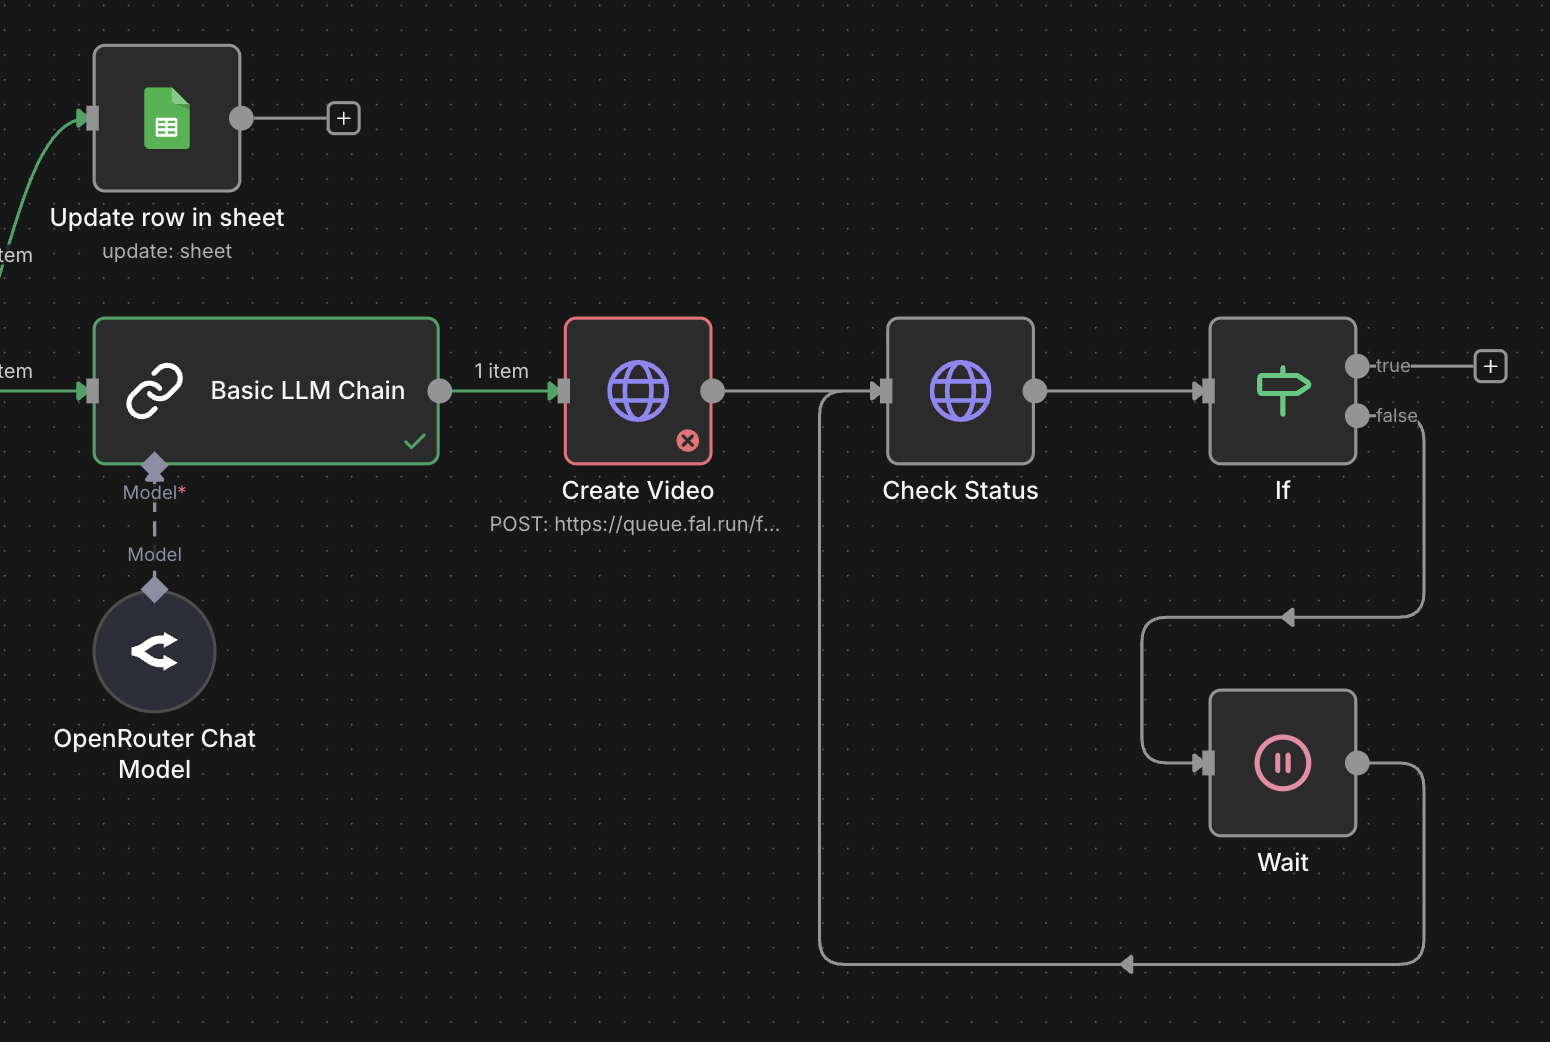
Typically, it takes a few seconds to a few minutes to render the video. We will need to keep polling that status checking endpoint until we are ready. To do this, we will need to create an if-wait loop to keep rerunning the status check endpoint. The below screenshot shows how to set up this structure.
The If node needs to be configured to go to the true branch when the video is complete, and false otherwise. If the video is not yet ready, we wait 10 seconds, and try again. Configure the If node like this:
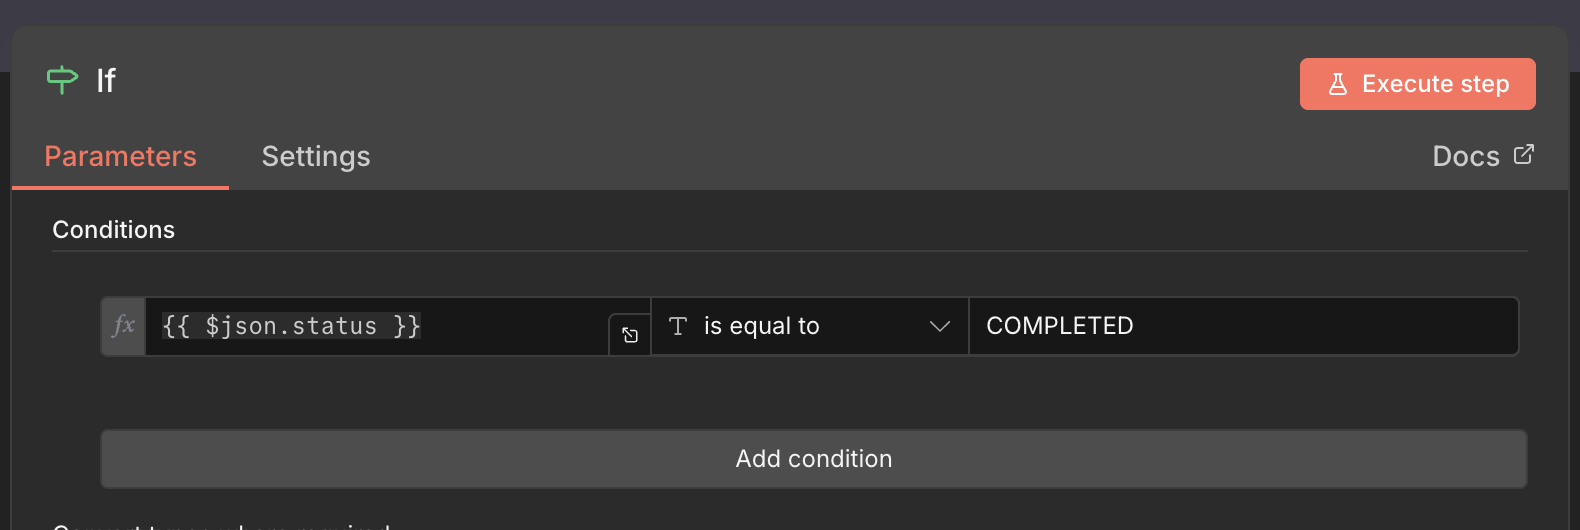
The way this works is that every time the node polls and the result is not complete, it will loop back around and wait 10 seconds before trying again. This will save on invocations as well, as we won't be slamming the status endpoint constantly.
Once the video is complete, we will now need to fetch the result to get our final video URL. We can do this by calling the result endpoint. As part of the status result, we will also will get a response_url which allows us to get the final URL to download the video.
Add a final HTTP Request node to the true path of the If node. This is the path the workflow will take once the video is completed. Inside, use the same header authentication as before, and use the response_url with the GET method.
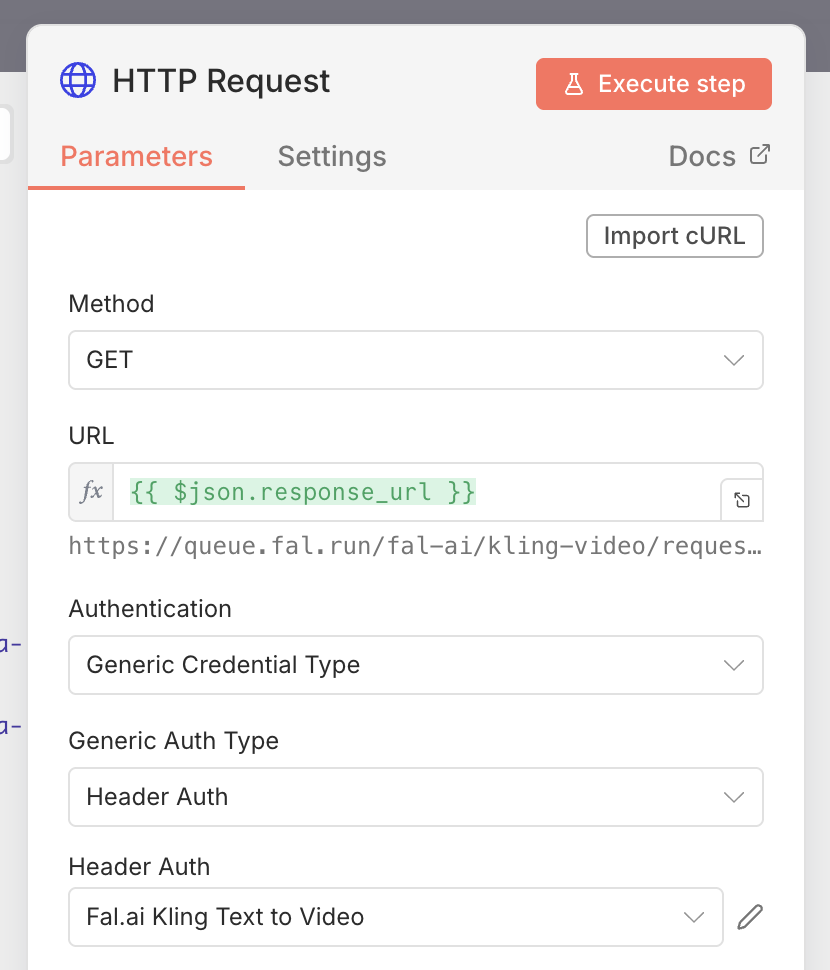
Run the step, and you should get back a JSON payload with a url that points to a mp4 file with your video. You can view this video in your browser by copy and pasting it into the url bar.
Step 6: Update Your Sheet
The last step is to put the video URL back into the spreadsheet, and set its status to Completed. To do this add a final Google Sheets -> Update Row In Sheet node to the output of the HTTP Request node where we got our video. We need to get the row_number of the row row in the sheet that we used. In order to do this, we actually need to use the result of the previous Google Sheets - Get Row. You can see in the screenshot below that we use the dropdown on the left to select this node. You can drag an drop the row_number from this payload onto the row number (using to match) field in the node configuration.
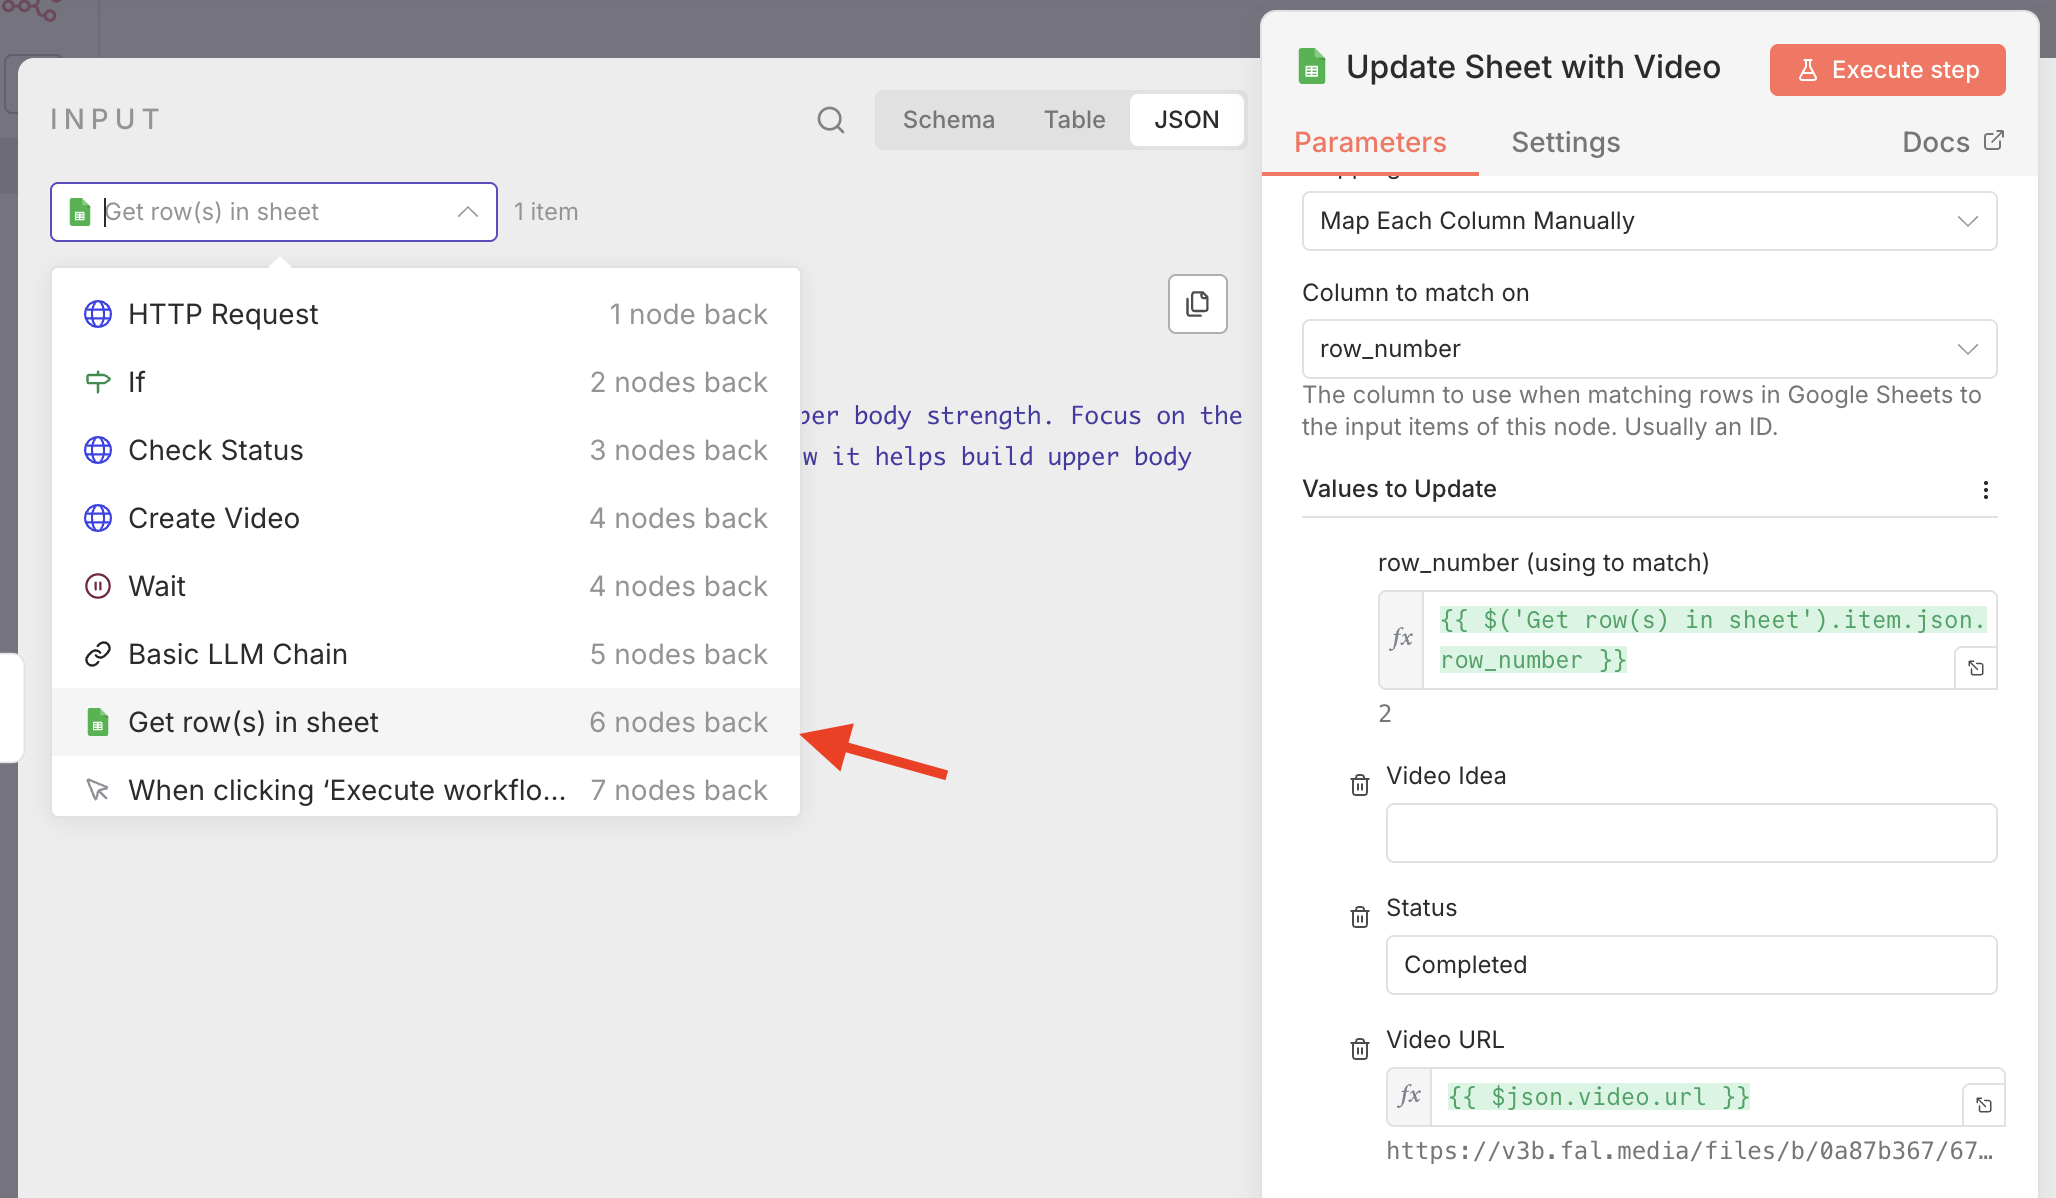
Execute the node, and check your spreadsheet. You should now see the video idea marked as Completed and the video URL pased into the sheet cell.
Below you can see our whole workflow:
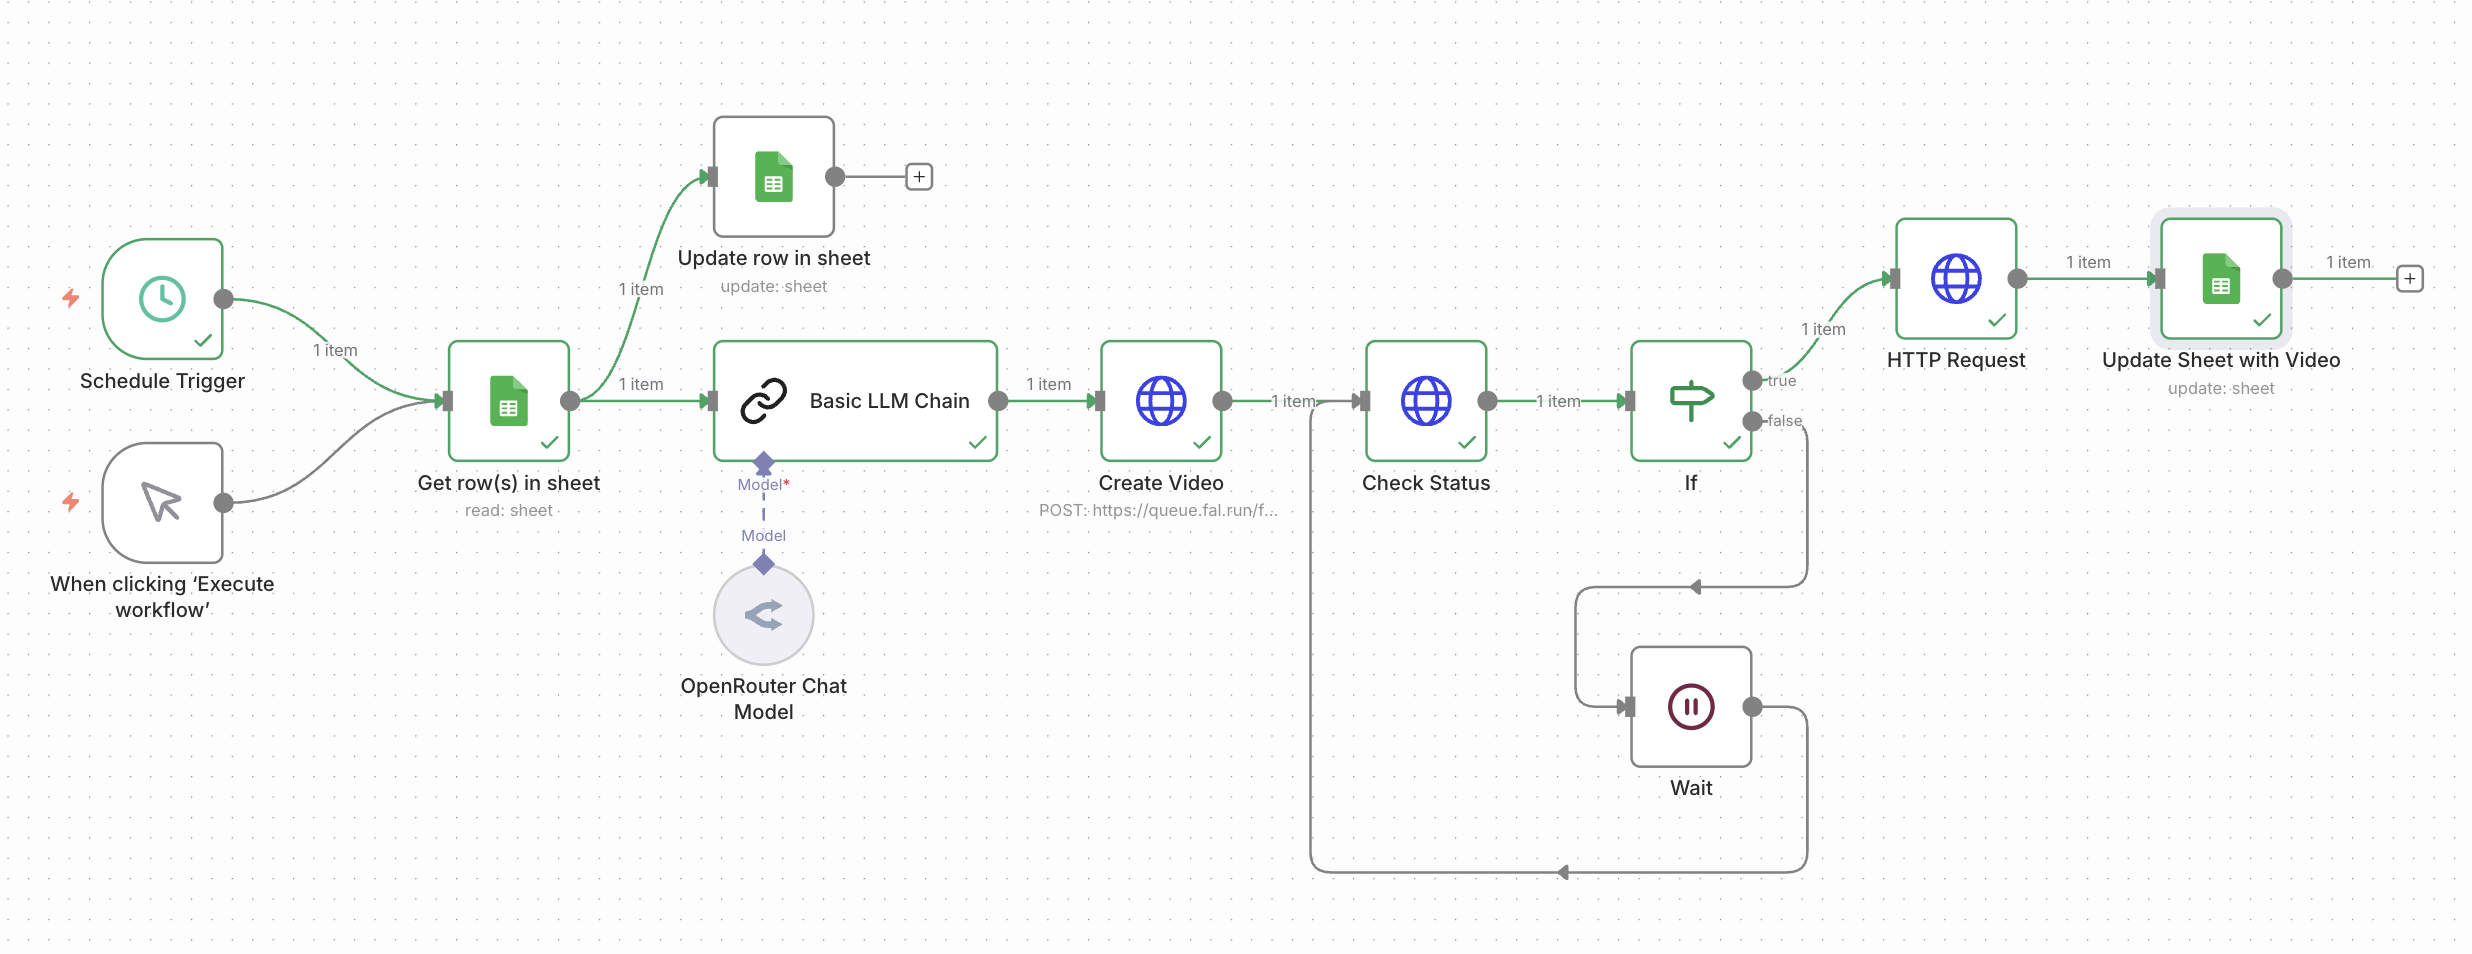
If you want to try it yourself, you can download the full JSON file here. Before sharing any exported workflows publicly, read our guide on anonymizing n8n workflows for safe sharing.
Next Steps
We now have a simple pipeline for turning ideas in a spreadsheet into actual short form videos. This is just the first step though! There a dozens of ways to improve and expand the workflow!
Add Audio Voiceovers
Right now we just have a video, but any good youtube video needs a voiceover. You can use a AI text-to-voice tool like ElevenLabs to generate a natural sounding voiceover for your video. Stay tuned for a guide on how to do this in the future!
Experiment With Different Models
For simplicity, we used Kling's easy to use text-to-video tool. However there are many others, each with their own pros and cons, and various features to try. Experiment with different models to find one that works best for your use case.
Automatic Uploading To Youtube
n8n also offers nodes that can automatically upload to Youtube, TikTok, and other platforms. You can automate your entire workflow end to end using these. Be careful though, as you will want to work carefully to make sure your videos are high quality before uploading or risk getting down-ranked by platforms!
Frequently Asked Questions
Can n8n automate the creation of short form videos?
Yes. n8n can orchestrate the entire short form video pipeline: pulling ideas from a data source like Google Sheets, generating a script using an AI model (GPT-4, Claude, Gemini), submitting the script to a video generation API like fal.ai or Runway, polling for the result, and writing the final video URL back to your data source. The whole process runs without manual intervention once the workflow is triggered.
What AI video generation models work with n8n?
Any model that offers an HTTP API can be called from n8n using the HTTP Request node. In practice, options with easy API access include Kling via fal.ai, Runway Gen-4, Luma Dream Machine, and Google Veo 3 via the Gemini API. Sora 2 is available if you have OpenAI access. fal.ai is a good starting point as it gives access to multiple models through a single API and has a free tier for testing.
How much does it cost to automatically generate short form videos?
Costs break down into three parts. The script generation via an LLM is minimal, typically a fraction of a cent per script with models like Gemini Flash. The video generation cost depends on the model and duration: Runway Gen-4 offers 125 free monthly credits (roughly 25 seconds of generation), while Kling on fal.ai charges per second of video generated. The n8n workflow itself costs based on execution count, starting at €20/month on the Starter plan. For testing, most options have generous free tiers that let you validate the full pipeline before spending anything.
Can I add AI voiceovers to automatically generated videos?
Yes, though it requires adding another step to your workflow. ElevenLabs is a popular choice, offering a free tier with 10,000 characters per month and a wide range of voices. You would generate the audio via the ElevenLabs API and then combine it with the video output in a separate step. The exact combining step (merging audio and video files) typically requires a tool like FFmpeg, which can be run via a self-hosted n8n instance or a cloud function.
Why use n8n instead of Make or Zapier for video automation?
n8n is a particularly good fit for this kind of workflow because the video generation step involves polling a status endpoint in a loop, which can require many repeated steps. In n8n, the entire workflow, including multiple polling iterations, still counts as a single execution. On Make or Zapier, each poll would consume credits or tasks, making the cost unpredictable. See our automation platform comparison for a full breakdown.
Is it safe to use the Google Sheets trigger for video automation workflows?
Be careful with the Google Sheets trigger. As mentioned in the tutorial, it fires as soon as any change is detected in the sheet, which means partially typed ideas can trigger the workflow before you have finished writing them. A schedule trigger (running once a day or on a set interval) combined with a "Pending" status column is a safer approach, since the workflow will only pick up ideas you have deliberately marked as ready.